Friday, July 31, 2015

Take time ....


Here is my card this week for Crafter's Companion.
I love these Create-a-Card dies so much I thought I would make another!!
It is made using the Create a Card Enchanted Die from Crafter's Companion.

Crafter's Companion

To make the card I cut, embossed and inked the embossed area twice.
I then cut another piece of Centura Pearl Card 1/4" larger than the die cut for both die cuts.
I then inked the edges of all the pieces and then using an edger tool roughened
up the edges and then used glitter glue lightly on the edges. 

I made a 7" x 7" Easel card and adhered the layers with 3D glue to the card.
The sentiment was stamped on the oval cut and then adhered so
 it sat lower than the front of the card.
The stopper for the card is the centre of the die cut adhered with 3D glue.
(I did cut and extra centre so that it raised evenly)
I die cut the Die'sire Leaf 2 die and using Peeled Paint distress ink coloured them and then shaped them.
I then adhered the leaves and flowers to the card, added the gems and Voila !!! Finished !

It really is quick and easy to make abut 20 mins but so effective!!

Happy crafting!

Thursday, July 30, 2015

Exploding Kite Tutorial


This week I have a tutorial over at Splitcoast Stampers
on how to create this kite card!
make sure you check it out HERE
There is a picture step by step guide and a video for you!
Have fun making some they are so easy to do !!!

I used Heartfelt Creations papers, stamps and dies to decorate
the Kite card !! 

Can you believe its August nearly ?? 
Blimey where has the year gone !! lol !! 
Mind you its as cold as it is in late October here this week.
So chilly!! I had two jumpers on yesterday!!
Have a wonderful day!
Happy crafting! 


Wednesday, July 29, 2015

Joy to the World


Hello !! It's Wednesday again and I have another card with the 
Sparkling Poinsettia Collection for Heartfelt Creations to share with you !!
I am so in love with the colour palette of this collection!!

Make sure you pop over to the blog to see the DT inspiration!
Click on the pic below:

Heartfelt Creations

I love making cards with the card fronts in the paper pads,
they make cards to easy to make, it's all done for you !!
Just add a sentiment and flowers!! 

To make my card I used the following:
HCST1-401 Flower Shaping Kit
159723 Art Institute Glue
HCPC-3680 Sparkling Poinsettia
HCPC-3679 Large Sparkling Poinsettia
HCDP1-256 Sparkling Poinsettia Paper pad
HCD1 765 Large Sparkling Poinsettia Die
HCD1 766 Sparkling Poinsettia Die
TSMP900 Memento Black ink
HCPC-3683 Joy to the World stamp set

Other Products Used : Peeled Paint distress ink, Stamens, Embossing pad,
Heat gun, gold embossing powder, 3D foam pads, gems.

Using folded white card cut a 6" x 6" tent fold card. Cut two card fronts
from the paper pad and adhere one to the inner of the card. Stamp the sentiment
onto the other card front. Cut the green rectangle out of the card front. Adhere 
the outer to the card. Adhere the centre to the card with 3D foam pads. Stamp, 
emboss and shape the flowers. Add the gems to the flower centres. Stamp, cut,
colour and shape the leaves. Adhere the flowers and leaves into place and your project
is complete.


Saturday, July 25, 2015

Thank you!


I needed a quick thank you card for my friend.
Thought I'd share it with you too.

I used Spellbinders die Victorian Heirloom Oval, and Oval dies.
Of course the papers are from the Raindrops on Roses Paper pad 
and Sun kissed Fleur flowers from Heartfelt Creations. 
The leaves are from Heartfelt too.

Hope my friend likes it !! 
Right best get on no ! There is no rest when the children are off school!!
Still I love having them home we have so much fun!!!

Have a great day!!

Wednesday, July 22, 2015

An archway of birds and flowers


Oh my goodness we have got a mini release this week

New dies to cut out the Paisley Peacocks and feathers !!!
I am so excited, I love these stamps and now its
so easy to cut them out too!!! 

Head over to our blog to see the amazing projects from the DT.
Click on the pic below

Heartfelt Creations

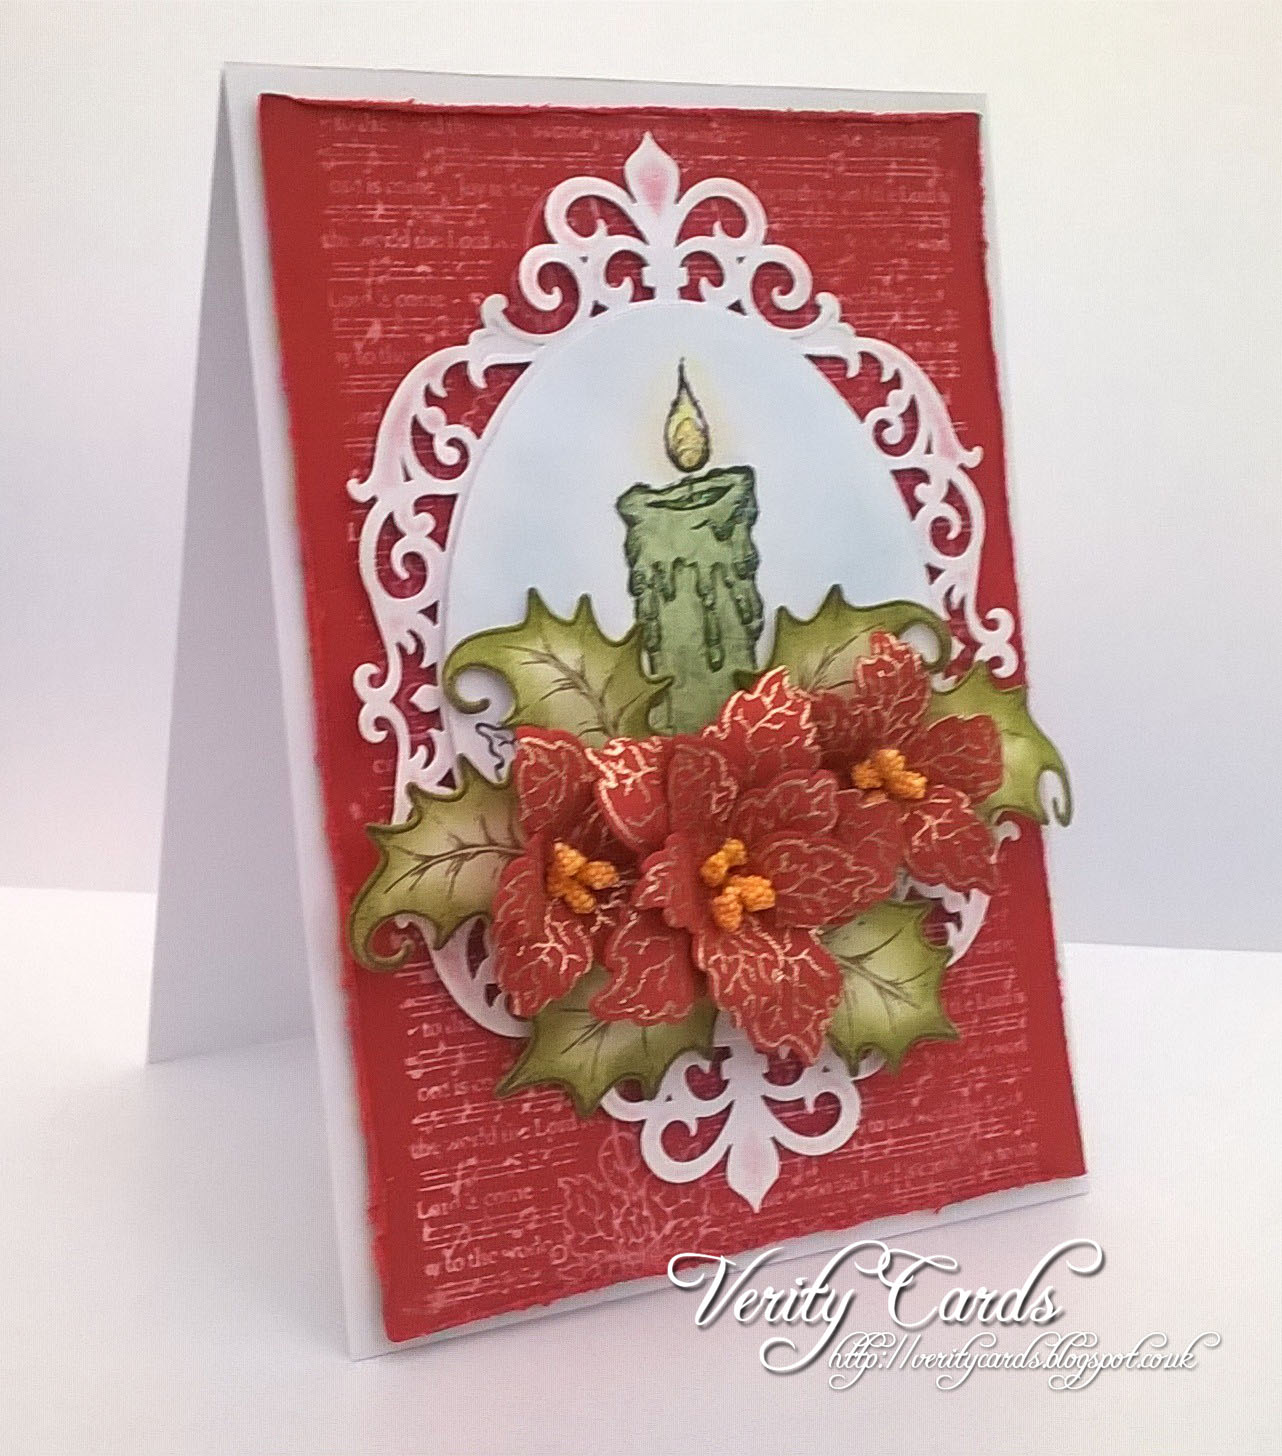
I have had this project in my head ever since I bought this arch in March!
Finally it is a reality!! It was so hard to photograph though!
Here is a look at the side.


Hope you like it! Caitlyn tried to sneak off with it!! lol
I told her it has to go to America to Emma Lou !!
Guess I will be making another one!! shh !!

To make the card I used :
HCST1-401 Flower Shaping Kit
TSMP 900 Memento Black Ink
TSMP 800 Memento Rich Cocoa Ink
RPEJ685 White embossing powder
CB80 ColorBox Frost white ink
71082 ColorBox Harvest Chalk 
HCD1-736 Classic Leaf Die
HCD1-760 Delightful Daisy Die
HCD1-759 Butterfly Medley Die
HCD1-771 Peacock Paisley Die
HCD1-756 Birds and Bloom Die
HCD1-757 Leafy Branch Die
HCD1-737 Ornate Gateway Die
HCD1-771 Peacock Paisley Die
HCPC 3656 Delightful Daisies Cling Stamp Set
HCPC-3660 Peacock Swirls Cling stamp
HCPC-3661 Feathery Peacock Cling stamp
HCPC-3545 Open Leaf Cling Stamp
HCPC-3546 Classic Leaf Cling stamp
HCPC-3644 Birds and Bloom Cling stamp
HCPC-3650 Butterfly Medley Cling stamp

Other items: Aqua pens(peacocks) - Bud Green, Sunflower, Peacock blue,
Faded jeans and Victorian Velvet for the flowers. Peeled Paint for the leaves.
Mustard seed and Victorian velvet distress markers for the butterflies.
American Decor Chalky Finish - Promesse, beads, gems, MDF archway, heat gun,
water brush, white card, Star Dust glitter glue, tacky glue.

Take your MDF arch and stand and cover with the chalky finish paint. When dry
fix the arch and stand together. Stamp the peacocks and three feathers. Colour using
the aqua pens and water brush and Die cut. Glitter the feathers and peacocks.
Go over the edges of the feather with Faded jeans ink. Stamp, cut, colour and 
shape the leaves. Stamp, cut. colour and shape the daisy flowers. Adhere beads
to their centres. Stamp, cut, colour and shape the blossoms. Adhere a gem into their
centre. Stamp and cut the birds. Colour the birds with the Harvest chalk on the 
chest and Faded jeans on the top. Stamp in white the butterflies and heat emboss
with white embossing powder. Die cut and colour on the back using the distress markers.
Adhere gems and gently shape the wings with your fingers. Die cut three gates and
adhere to the archway. Adhere the peacocks to the arch. Adhere the leaves, birds, 
butterflies and flowers and your project is complete.

Happy crafting!!

Monday, July 20, 2015

Happy Birthday


Here is my card this week for Crafter's Companion
You know I fell in love with these Edge'ables !
You know I love white cards too .......
Still I did add some yellow!! lol!!
Hehe it has to be one colour I rarely use!

Just a quick post ......... best get on! 
School holidays don't equal a sleep in in this house !! lol!!
Have a great day!! 

Yo make the card I used:
Die'sire Edge'ables - Butterfly Dreams
Die'sire Only words - Happy Birthday
Die'sire Leaf 2 die
Dotty Embossing Folder

Other items: Pearls, Distress tool

Wednesday, July 15, 2015

Have a joyous Christmas


Oooh yes it's Wednesday again!!! 
That means I have a Heartfelt Creations project to share !!
Lol some of you may have seen Nikki and the presenter
talking about this card on Create and Craft!
The debate was where did I get the flower centres !!
Lol Shhh ...... I tore them out of pre-made flowers and reused them !!

I am so loving the Poinsettias! Those leaves are what I have been
looking for without knowing it for years !!!  LOVE them!!

Make sure you stop by the Heartfelt Creations Blog HERE
there is some fantastic inspiration! 
You can see the whole Sparkling Poinsettia Collection HERE

I'm sorry I've been a bit quite recently.........
I've been busy designing and creating card kits for my classes!!
I'm so excited !! I have two classes here in the UK and one of them is Christmas !! 
See the post HERE for details, I'd love to see you! 

To make this card I used:
HCST1-401 Flower Shaping Kit
159723 Art Institute Glue
TSMP900 Memento black ink
TSMP800 Memento Rich Cocoa Ink
HCD2-752 Cut Mat Create 2B die
HCPC-3682 Sparkling Poinsettia Swirl Cling stamp
HCPC-3680 Sparkling Poinsettia
HCPC-3679 Large Sparkling Poinsettia
HCD1 765 Large Sparkling Poinsettia Die
HCD1 766 Sparkling Poinsettia Die

Other Products Used : White card, Antique Linen and Peeled Paint 
distress ink, Stamens, Embossing pad, Heat gun, gold embossing powder,
3D foam pads, red ink, Spellbinders labels 47 Decorative Elements

Die cut two of the labels 47 on white card. Adhere one side together to 
form a card. Stamp the sentiment and die cut with HCD 752, inking with 
the Antique Linen ink inside the die. Adhere with 3D foam pads over the 
centre of the card. Stamp the flowers and heat emboss with gold powder.
Shape the flowers and adhere together with a stamen in the centre. Stamp,
cut and colour the leaves. Adhere the flowers and leaves to the card and 
your project is complete.


Monday, July 13, 2015

Merry Christmas


Here is my card this week for Crafter's Companion!
I love the new Nordic Christmas collection !
For my card I used the CD but I think I need some of those embossing folders!!
Shhh ! lol ! I'm already eating beans on toast this week
as I bought some new Edge'ables!! 
The list never really ends does it !! lol!!!

Have a wonderful day! I'm off to make .....
oooh nearly told you !!! lol!!
You will find out soon honest!!! 

To make the card I used the following:


Other items: Poinsettia, snowflake tree decoration, Peeled
Paint, Broken China distress ink.

Happy crafting!!

Wednesday, July 08, 2015

Sparkling Poinsettias


Oh I'm so excited !
 It's Wednesday and I get to share my card for Heartfelt Creations!
PLUS it's a new release !!!
Oh my goodness these Poinsettias are gorgeous!!
See the collection HERE

Make sure you stop by the blog to see the Design team projects!
Click on the pic below


So are you looking forward to Christmas ???
Isabella sure is she keeps asking to move the chair so we can buy a tree !lol!
Well it is her birthday at Christmas !!! lol!

To make my card I used:

HCST1-401 Flower Shaping Kit
CB80 ColorBox Frost White Ink Pa
159723 Art Institute Glue
HCPC-3680 Sparkling Poinsettia
HCPC-3679 Large Sparkling Poinsettia
HCPC-3684 Sparkling Poinsettia Notes
HCPC-3681 Sparkling Poinsettia Candle
HCDP1-256 Sparkling Poinsettia Paper pad
HCD1 765 Large Sparkling Poinsettia Die
HCD1 766 Sparkling Poinsettia Die


Other Products Used : Red and white card, Faded Jeans and Peeled Paint 
distress ink, Stamens, Embossing pad, Heat gun, gold embossing powder,
water brush, yellow aqua marker, Spellbinders Grand oval die and 
Spellbinders Fleur de Elegance die, 3D foam pads, edger tool.

Using folded white card make a 7" x 5" tent fold card. Cut a piece of
red card 6 3/4" x 4 3/4" stamp the background image on it in white ink
and distress the edges. Stamp, emboss and shape the flowers. Add the stamens
to the flower centres. Stamp, cut, colour and shape the leaves. Stamp the 
candle image onto white card and die cut with the grand oval die. Colour
the image and shade around it with the blue ink. Die cut the elegance oval
and with 3D foam pads adhere the image to the elegance die cut. Adhere this
to the card. Adhere the flowers and leaves into place and your project
is complete.

Happy Crafting!

Sunday, July 05, 2015

Classy and Fabulous !


Ooh Darhling so fabulous!! lol!!!
Here is my card this week for Crafter's Companion.

These Scruffy Little Cat images remind me of a friend!
Best not say who though Lol!!!

Can you believe we are in July already??? 
Wow how fast is the year going!!! 
School breaks up here in the Uk soon!
Awesome !!! Looking forward to fun with my girls!

To make the card I used the following:
Dotty Embossing folder
Lattice Embossing folder
Leaf 2 Die

Other Items: Ribbon, black ink, Berrylicious and Harvest Chalk ink

Happy Crafting!!

Wednesday, July 01, 2015

Have a Wonderful Day


It's Wednesday!!! That means I have a card to share with you
that I created for Heartfelt Creations!
Something a little different from me today!
Oh and Pink flowers have crept back in !!! lol!!

Make sure you stop by the Heartfelt Creations Blog
There are sneak peeks of our new release next week!! 
Click on the pic below:

Heartfelt Creations

If you swapped out the pink flowers for blue this would make a great masculine card!
I made these flowers ages ago and have been
lining them up against paper to see what pops, 
I really liked this look against the Kraft card, 
or I would have used blue flowers!!! lol!

Here is what I used to make the card:
HCST1-401 Flower Shaping Kit
HCD1-743 Raindrops on Roses Die
HCPC-3665 Everyday Heroes Newsprint Stamp
HCD1- Everyday Heroes Die
HCPC-3673 Heartfelt Sentiments
HCD2- 751 Cut Mat Create 2A die
HCD2-752 Cut Mat Create 2B die
HCPC-3563 Postcard Cling Stamp
RPEJ685 White Embossing Powder
CB80 ColorBox Frost White Ink Pad
2pnk Pink Gala Glitz
159723 Art Institute Glue


Other Products Used : Kraft Card, Spellbinders Circle Die, 3D foam pads,
Victorian Velvet and Antique Linen Distress Ink pads, white pen, white card,
heat 

Using folded Kraft Card die cut a card using the large 2A Die. Ink the edges 
with Antique Linen ink. Die cut the large 2B die and stamp the image in white
ink and heat emboss with white powder. Ink the edges with Antique Linen ink
and adhere to the card with 3D foam pads. Die cut the Raindrops on Roses die
and the circle die. Ink the edges of both die cuts. Using a white pen draw
short lines around the inner of the circle die cut. Adhere the circle to the 
Raindrops on Roses die cut with 3D foam pads and adhere to the card. Stamp
the arrow and sentiment in white ink and heat emboss with white powder.
Die cut the leaf swirls. Stamp, cut, colour and shape the flowers adhering
Pink Gala Glitz to the centres. Adhere the flowers, sentiment and leaf swirl
to the card and your project is complete.

Happy Crafting!