Friday, October 31, 2014

Thanksgiving Treats Tutorial


Today I have a tutorial for you that is featured on the Heartfelt Creations blog!
On how you can make this
lovely sectioned box which I thought would be great
on the Thanksgiving table with snacks inside.
OR as a gift full of treats to take if your going to
friends or family for Thanksgiving!!! 

Heartfelt Creations

I made it using the Sunflower Collection from Heartfelt Creations.
It really is very easy and quick to make!! 


To make this you will need the following supplies:

HCDP1 247 Classic Sunflower Collection paper pad
HCD 753 Classic Sunflower Die
HCPC  3626 Classic Sunflower PreCut stamp
HCPC 3545 Open leaf Stamp
HCD 736 Classic Leaf Die

Other supplies:
Score board and tool, Paper cutter
Scissors, Glue, Hot glue gun
Scattered Straw, Wild Honey Distress Inks (Flower)
Peeled Paint Distress Ink (Leaf)
Beads, Colouring pens, 3D foam pads
White and Brown Card


To make the box you will need :
1 x 12" x 12" white piece of card.
(you could make this from double sided papers and then you 
would not need the squares and triangles of contrasting papers )

5 x 4" x 4" squares of paper (I used the spotty ones for this)
4 x 4" x 4" squares of the same paper as above and cut into triangles

4 x 4" x 4" squares of contrasting papers ( I used the yellow ones for this)
4 x 4" x 4" squares of the same papers as above and cut into triangles.


Take the 12" x 12" piece of card and this is the pattern you will score
on the card to make the box


First score 4" and 8" along on one side.
Then turn the paper so those score lines are horizontal and score
again at 4" and 8" down the card. So you have 9 4" squares on your card.


Now score diagonally along the four corner squares.
This is the fiddliest part of the whole project!
Start at the inner corner and gently find a line to score on.
Bring the outer point in line with the score line and score.


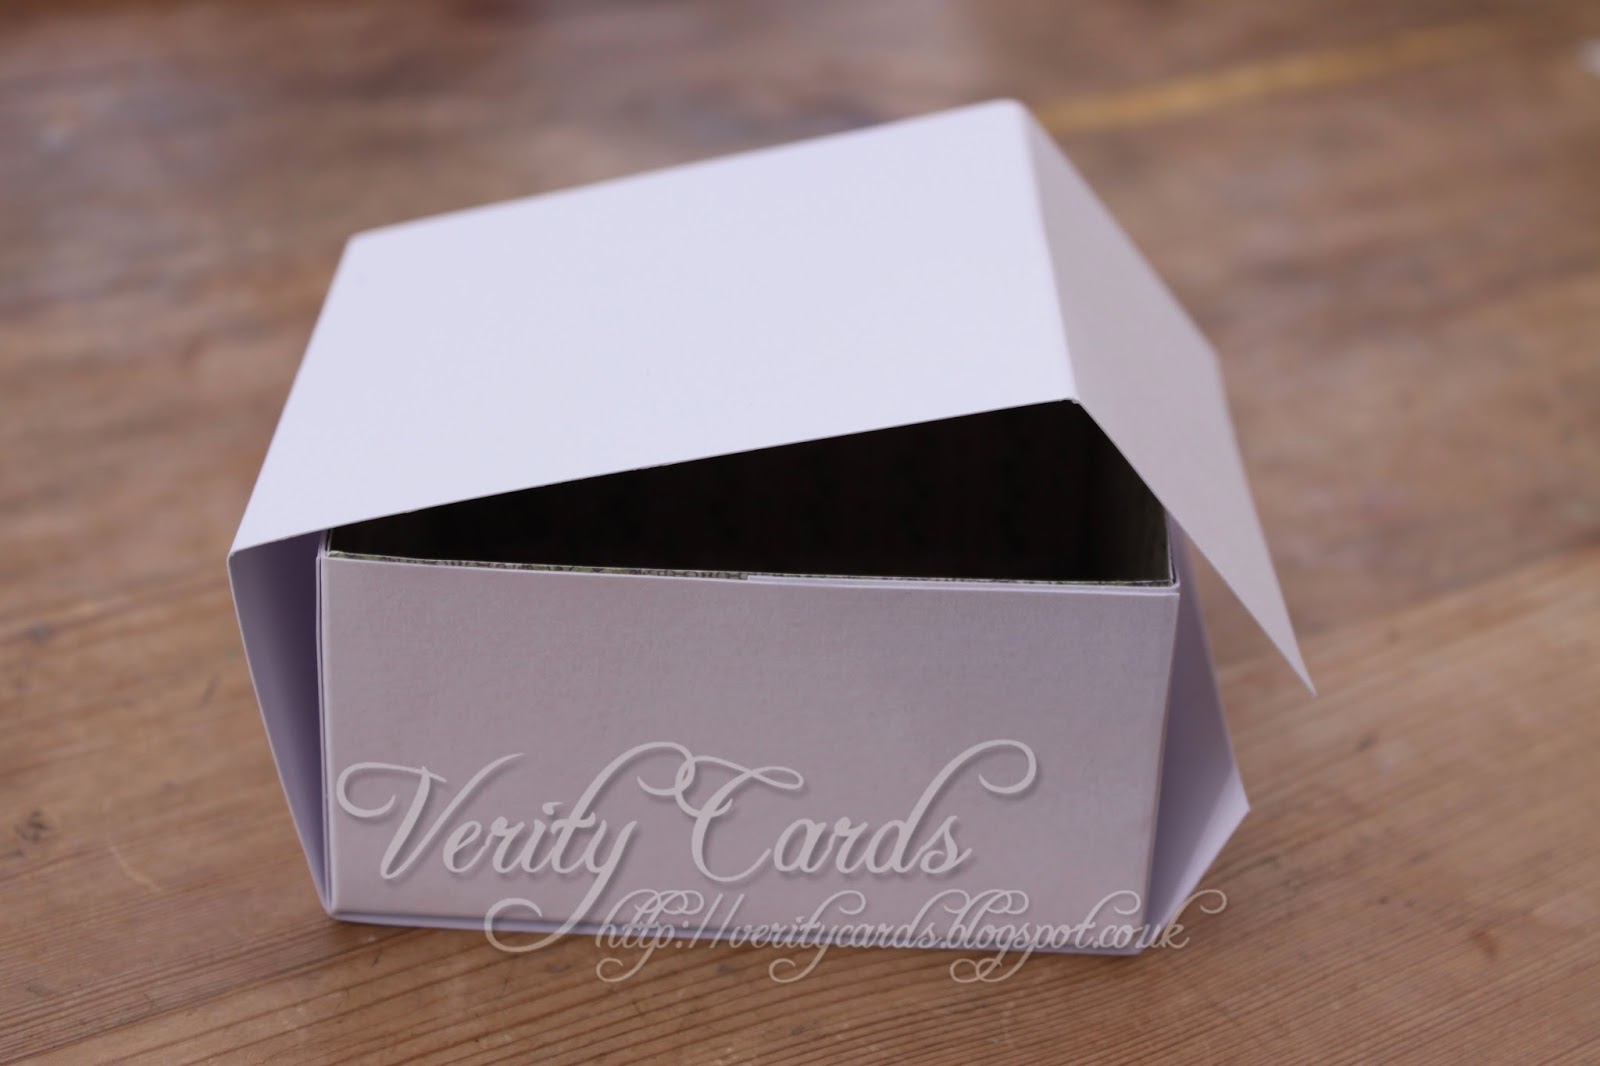
Fold along all the score lines, folding the corners so
that the fold comes inwards towards the project


This is how the folds should look like now.


First we will decorate the inside of the box.
Take the 5 4" x 4" sqaures


Adhere them to the four outer squares that aren't scored diagonally.


Now take the 8 triangles cut from four 4" x 4" sqaures


Adhere the triangles to the diagonally scored sqaures


Adhere the 5th square to the centre of the box inner and 
your card should look like this.


Now turn the card over and decorate what will be the outer of the box.
Adhere the 4 x 4" x 4" squares to the card
The middle will be left white as this is the base of the box.


Adhere the 8 triangles cut from the 4 4" x 4" squares.


There are two ways we can bring this together as a box.
This is how I did it on my box.

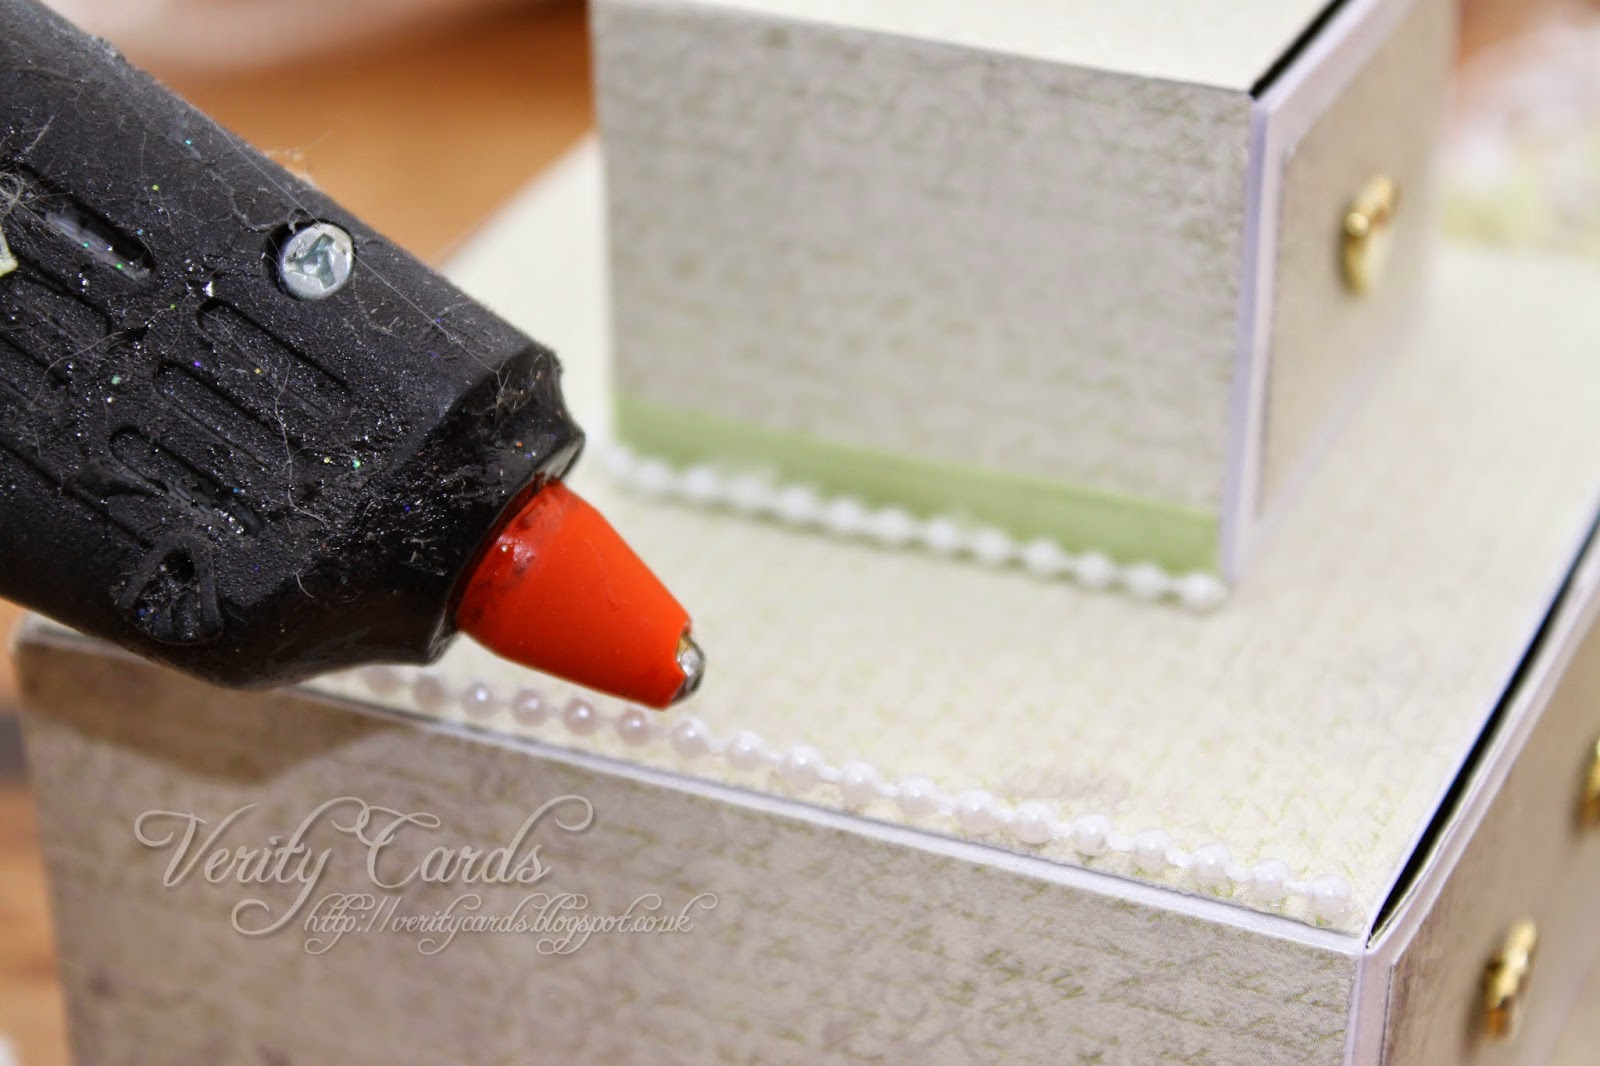
Fold the Diagonally scored corners into the centre of the box and
hot glue them together. Hold them in place until the glue cools and sticks.


I then hot glued the leaves and a flowers on the top of the join
to cover up the hot glue and to make it stronger.


The second way is to tie the corners together.
Punch a hole on each corner on the score line.


Thread ribbon through the holes and tie together in the centre.


When the top is secure all that remains is to decorate it! 


For my box I cut out two each of two of the journalling panels from the paper pad.
I cut the larger one down to the same size as the smaller (one on the left of the above pic)
piece and cut brown card 1/4" larger than the papers.
Adhere the paper to the card using 3D foam pads;
and to the sides of the box with 3D foam pads 
alternating the papers as you go around the box.

Make the flowers, I have a tutorial HERE on how I made them.

Stamp and Die cut three of the larger leaves from the Classic leaf stamp set.
(These go on the top of the box)
Colour using Peeled paint ink. Gently ink over the leaves first and then 
go around the edges with heavier ink to create shading.
Lastly Shape the leaves.

Adhere the flowers to the box.

Colour the ladybirds (they were on the sunflower stamp)
Shape them and adhere to the box and your project is complete.

Hope you have fun making this !
Happy crafting.


Wednesday, October 29, 2014

A Bucket of Sunflowers


Its Heartfelt Creations Wednesday !!!
FIRST of all I want to THANK everyone from the bottom of my heart
for voting for me for the Design Team.
Its been a while since it took place and today the 2014/2015 team has been announced !!!
I am so thankful to you all you have helped my dream continue another year!
THANK YOU !!!
( I need to find some candy me thinks !! Will search some out soon !)

Its such a hard time as we have some DT members leaving, they 
have become great friends and I will miss them.
We also have the excitement of new teamies joining us
I am so looking forward to getting to know them !!
Pop on over to the HC blog to find out the new team and please
go visit their blogs there is some stunning work !!

Heartfelt Creations

Here is my project this week .........
I'm not sure what you call this fold !!!
BUT I do love them! It makes me decorate the inner too!!


To make the card I used the following:

HCD 753 Classic Sunflower Die
HCPC 3626 Classic Sunflower Stamp
HCPC 3628 Sunflower Bouqet
HCPC 3474 Heartfelt Expressions PreCut set
459222 Blossom Tool set
452255 Grand calibur

Other Products Used : White card, Beads, glue, 3D foam pads,brown ink, 
Wild honey and scattered straw distress inks, alcohol markers, brown card,
Spellbinders circle die.

Cut a 7" x 7" side fold card. Fold the front of the card backwards on itself
t create the shape of the card. From the paper pad cut two 6"x 6" paper
panels. Cut a 6 1/4" x 6 1/4" piece of brown card and adhere one of the
6" x 6" panels to it. Adhere this to the inner of the card. Cut the other 
6" x 6" panel in half. Cut 2 x 3 1/4" pieces of brown card and adhere the paper
to each one. Adhere one to the front fold of the card and the other to the inner 
of the card. Cut two card fronts from the paper pad. Cut a piece of brown card
1/4" larger than the card front. Stamp the sentiment on one card front and adhere
it with 3D foam pads to the inner of the card. Adhere the other card front
to the front folded panel with 3D foam pads. Stamp your image and colour using 
alcohol markers. Die cut with the circle die, ink the edges and adhere to the 
card with 3D foam pads. Make your flowers I have a tutorial HERE
and adhere them to your card. Colour the ladybirds in and adhere them to your
card and your project is complete.

Happy Crafting !!

Saturday, October 25, 2014

Jewellery Gift box Tutorial


I needed a box for my daughter's present ........ but shhh don't tell her !!
I thought this would be perfect as a jewellery gift box.
A pair of earrings in the top and a necklace in the bottom drawer.

As I made it I thought I would do a tutorial on it too!!

I made it from Heartfelt Creations Raindrops on Roses paper pad,
and the butterfly stamp from the Sunflower collection.

Heartfelt Creations

This is a look at the back of the box.


To make it I did the following:

TO MAKE THE BASE DRAWER SECTION

 Cut the following:
1 x 8" x 8" white card
1 x 4" x 13" white card (cut from an A3 sheet)
1 x 4" x 4" paper for outer top
2 x 4" x 2" paper for outer sides
1 x 2" x 5" paper for the outer back
1 x 1 3/4" x 3 3/4" paper for outer drawer front
3 x 4" x 2" paper for the inner sides
1 x 4" x 4" for the inner base


Using the 8" x 8" white card score 2" on each side.


Cut into the corners to make tabs to adhere to form the box.


Fold along the score lines and adhere the tabs to make the box.


Adhere the inner paper pieces to the inside of the box.
(TIP trim 1mm off one side of the side pieces and two sides 
of the base square to get a really good fit. Being the inside 
of the box it is just slightly smaller than the outer sides.)


Using the 4" x 13" piece of white card score at 1/4" on one edge.


You could score along it to make the folds for the warp around BUT
the better way is to wrap the card around the box making your own folds. This 
way the drawer can slide inside the wrap otherwise it can be too tight
and the drawer wont open !!


Adhere the wrap together at the 1/4" piece you scored.


Now take the 2" x 5" piece of paper for the outer of the box.
adhere it over one open end to form the back of the drawer section.
I scored 1/4" on the paper and adhered it to the side, folding it over the edge
of the other side and adhering it in place.


Using the other side pieces 2" x 4" adhere around the sides of the drawer.
Adhere the side pieces to cover over the pieces from the back.


TO MAKE THE TOP DRAWER SECTION

Basically we are going to do exactly the same thing but on a smaller box!

Cut the following:
1 x 5" x 5" white card
1 x 1 1/2" x 8" white card
1 x 2" x 2" piece of paper for the inner
4 x 2" x 1 1/2" paper for the inner
1 x 2" x 2" paper for the outer top
1 x 1 3/4" x 1" for the front of the drawer
2 x 2" x 1 1/2" paper for the outer sides
1 x 3" x 1 1/2" paper for the outer back


Using the 5" x 5" piece of card score 1 1/2" on all sides.


Cut into the corners to form tabs.


Fold along all score lines and adhere the box together.


Adhere the inner pieces of paper to the box
(Remember the top tip from the larger drawer)


Using the 1 1/2" x 8" piece of white card score 1/4" on one short side.


Wrap the card around the box as before.


Adhere the warp together along the 1/4" scored section.


Cover the sides and top of the box, remember to adhere the 
back piece first as we did with the larger drawer.
(Score 1/4" and adhere to the side and fold over the other edge adhering in place)


Adhere the two drawer front pieces to the drawers.
Using a hole punch punch one hole in the top drawer in the centre,
and two holes in the bottom drawer equally spaced.


Put brads into the holes and fasten.
the brads are used to open the drawers with.


Cut a piece of white card 5" x 5".
Cut a piece of paper 4 3/4" x 4 3/4" and adhere to the white card.
This will form the base of the project.


Adhere the bottom drawer onto the base in the centre of the card.


Adhere ribbon around the bottom of the drawer section where it meets the base.


Now hot glue string pearls along the base.


Using the top drawer adhere ribbon along the bottom of the drawer.


Adhere the drawer to the bottom drawer.


Hot glue string pearls around the bottom of the top drawer.


Adhere string pearls around the top edge of the bottom drawer.


And adhere string pearls around the top of the top drawer.


Now all you have to do is decorate it as you wish !

This is a photo with the drawers closed.
I also decided to adhere the front papers with 3D foam pads to 
give some dimension to the project.


Here is a close up of the back of the project.
as you can see I used inks to colour the swirl leaf die cuts.


Hope you have fun !!! 
Happy crafting !