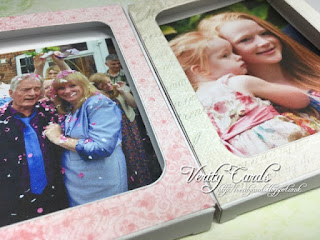
I've been playing with the new shadow boxes from Heartfelt Creations!
I wanted to use them in an alternative way other than that on a card.
Here is my first idea I had a photo frame!
Here is a tutorial for you so you can make one too!
Step 1: Cut a piece of white card 14 2/16" x 3 1/4" and score at 3 1/4", 6 1/2", 7", 7 1/2", 10 14/16"
Step 2: Fold along the score lines so the piece of card looks like the above picture.
Step 3: Cut a piece of paper to go over the front of the Shadow box 3/14" x 4 7/16".
Place over the back of the box in the score lines where it will sit on the front of the box.
Step 4: Turn everything over without moving the paper and draw in pencil around the aperture.#
Step 5: Using the Cut Mat Create Die die cut the centre out of the paper.
Repeat this for all four of the shadow boxes for the photo frame.
Step 6: Adhere over the front of the shadow box and place a picture inside.
Step 7: Using a piece of paper ribbon from the paper pad adhere around the
side and top of the shadow box.
Step 7: Adhere the first shadow box to the long piece of scored card.
Ensure the score line is to the right of the box.
TIP: It is easier to adhere to by actually folding the card as you are doing it
to ensure it has that fold in the right place.
Step 8: Adhere the second box in place to the card also adhering the side of the mountain
fold to the side of the shadow box.
Step 9: Adhere the next shadow box to the other side of the mountain fold and the card piece.
TIP: Make sure it can fold flat together as you are adhering this
(this is why the next panel has a little extra width to it or it gets too tight! I made mine 2/16" smaller and it worked but just needed a little extra room to account for the folds!)
Step 10: Adhere the last panel and the basic frame is finished!
It can all close up together too at this point! Once you add 3D flowers
this does become harder to achieve tho........
Step 11: Decorate your frame as you choose!
I just added flowers and leaves but as I used my wedding photos I could have used images from the Classic Wedding collection to decorate each panel!
I used the flowers and leaves from the Window Box Fillers stamp set to decorate my frame and colored them in Berrylicious ink and then glittered them with Crystal Clear powder!
Just have fun! These would make fabulous gifts and home decor!
Make sure you share your projects with us on the Heartfelt Creations Facebook Page HERE
I used the following to make this project:


Hi Liz...this is fantastic! Great idea for the family photos. Another great use for those wonderful shadow boxes...keep it up and they will get sold out in a jiffy! Hugs
ReplyDeleteSuperb idea!! Thank you for the Tutorial
ReplyDeleteCheers
Dr Sonia