Wednesday, November 30, 2016

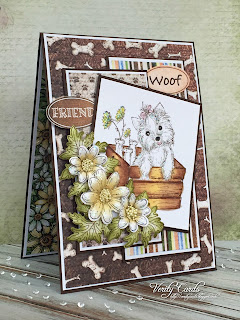
For a friend!


It's Wednesday and here is my card this week for Heartfelt Creations!
Can you tell I LOVE this image!! Lol project no:3 with it!! 
Well I do have a Westie and I can't resist!!! lol!!!

It's been ages since I did some colouring......... 
I thought I had better get on and do some lol!!! 

Make sure you stop by the Heartfelt Creations blog
there are as always amazing projects for you! 
Click HERE to go to the blog. 


To make my card I used the following: 
HCST1-401 Flower Shaping Kit
HCDP1-272 Pampered Pooch Paper Pad
HCPC-3761 - You're Paw-fect
HCPC-3656 Delightful Daisies Cling Stamp
HCD1-760 Delightful Daisy Die
ANC850 Spring Bling Prills (Lemon Chiffon)
TSMP800 Mement Rich Cocoa ink pad
159723 Art Institute Dries Clear glue

Other Products Used : Brown and White card, Spectrum Noir Illustrator Pens Pink Lace,
True Black, Soft Brown, Daffodil, Blender, Muted Brown, Pearl Blue, Ice Grey2,
Earth Brown and Ivory

Create a 7" x 5" tent fold card using the brown card. Cut a piece of white card 
4 14/16" x 6 14/16". Cut a piece of paper from the pad 4 3/4" x 6 3/4" and adhere 
them to the card. Cut two pieces of brown card, one 2 3/4" x 5" and one 5 3/4" x 2 10/16".
Cut two pieces of white card 2/16" smaller on each side to layer on the brown card and then
again with the papers from the paper pad. Adhere the layers and adhere to the card. Stamp and 
colour the image and cut 3 5/16" x 3 3/4" Cut a piece of brown card 3 1/2" x 3 14/16", layer
and adhere the image to your card. Cut two sentiments from the paper pad and adhere to the card.
Stamp, cut, colour and shape the flowers and leaves. Adhere prills into the centre of your flowers
and glitter the petals. Cut another piece of white card 6 14/16" x 4 14/16" and adhere to the inner
of the card. Cut a piece of paper 4 3/4" x 6 3/4" and adhere to the inner of your card. Your project
is now complete.
Wednesday, November 23, 2016

Black Friday Blog Hop peek!


 EEK so we are all so excited to be doing a blog hop here at Heartfelt Creations!
Hope you have had fun seeing all the sneak peeks of our projects for 
Friday with all the new goodies we have for you!
You will have come from Sandy's blog, but if you get lost at any point along the way
we have a list of all the ladies in our hop at the bottom of the post!
Make sure you stop by them all and leave a comment!

I had so much fun making my card this week! From the front it looks like
a card BUT when you start to open it behind each layer are
journal pieces to add little messages or pictures! 
It become so much more than a card! 
Keep reading there are lots of pics of each of the inner layers! 

Here is my card stood up, I love these foldout cards they add such dimension!


I am the penultimate blog in the blog hop, the next blog is LORI
We hope you have enjoyed seeing what we have on Friday for you!
Remember to comment you could win a full set of the Fold out cards and Dies!


You have until 11.59pm on the 28th November to join in.
The prize contains the following:
1x Delicate Border Basic Die
1 x Classic Border Basics Die
1 x Fleur Border Basics Die
1 x Elegant Border Basics Die
1 x pack of 4 1 1/4" x 5 1/2" Foldout cards Black
1 x pack of 4 1 1/4" x 5 1/2" Foldout cards White
1 x pack of 4 1 1/4" x 5 1/2" Foldout cards Kraft
1 x pack of 5" x 7" Foldout cards Black
1 x pack of 5" x 7" Foldout cards White
1 x pack of 5" x 7" Foldout cards Kraft
1 x pack of 6" x 6" Foldout cards Black
1 x pack of 6" x 6" Foldout cards White
1 x pack of 6" x 6" Foldout cards Kraft

A winner will be announced on the Heartfelt Creations Blog and Facebook on 30th November.


The winner will need to email info@heartfeltcreations.us to claim their prize.
A full list of the blog hop can be found at the bottom of the post.


To check out more about the Black Friday releases
 and the savings we have for you CLICK HERE

To make the card I used the following

HCST1-401 Flower Shaping Kit
HCDP1-250 Birds and Bloom Paper Pad
HCD1-756 Birds and Bloom Die
HCPC-3644 Birds and Blooms Cling Stamp set
HCPC-3673 Heartfelt Sentiments Cling Stamp set
HCCF1-444-2 5"x 7" Fold Out Cards White
HCD1-7120 Fleur Border Basics
TSMP900 Memento Tuxedo Black
TSMP800 Memento Rich Cocoa ink
159723 Art Institute Glue

Other Products: White card, glitter glue, gems Distress inks - Broken China, Antique 
Linen and Peeled Paint

Using white card cut the borders and adhere to the card. It doesn't matter which 
side you glue it to we are going to cover both sides of the card. Cut out papers
to adhere to all sides of the card and a card front for the inner back to write on.
Create pockets on the backs of the folds, fussy cut from the paper pad the birds and flowers
to create a top to the pocket. Glitter and cut small journal panels
from the paper pad, glitter those as well and then put into the pockets. Stamp, colour and shape
the birds and branches. Adhere gems to the flowers and glitter then adhere to the card fronts.
Fussy cut the bird bath and fence, adhere to the card and glitter. Cut a 5" x 7" piece of paper
and adhere to the back of the card. Cut a piece to make a pocket and glitter. Cut three
journal pieces and glitter. Put them into the back pocket and  your project is complete.

Full blog hop list:

And me you are here!
Lori Williams

Wednesday, November 16, 2016

Happy Birthday!


Yay it's Wednesday again! Here is the card I made to go with my bag last week
for Heartfelt Creations with the Pampered Pooch collection!

HCST1-401 Flower Shaping Kit
HCDP1-272 Pampered Pooch Paper Pad
HCPC-3760 Paw-fect Pooches Cling Stamp
HCD1-7116 Paw-fect Pooches Die
HCPC-3656 Delightful Daisies Cling Stamp
HCD1-760 Delightful Daisy Die
ANC850 Spring Bling Prills (Lemon Chiffon)
TSMP800 Memento Rich Cocoa ink pad
159723 Art Institute Dries Clear glue

Other Products Used : White card Glitter glue, Scattered Straw, Tea Dye and Peeled Paint Distress inks, 
3D foam pads, Kraft Knife

Create a 6" x 6" tent card with the white card. Cut a 6" x 6" paper panel from the paper pad
and adhere to the inner of the card. Glitter the flowers. Cut a card front from the paper pad
and cut the centre image and out square. Adhere the three parts of the card front to the card
so that each level is a different height. The fist adhere to the card and then the next use one 
layer of 3D foam pads, The image adhere with 2 layers of foam pads. Glitter the image, flowers
and edges of each layer. Stamp, cut ,colour and shape the flowers and leaves. Adhere prills
to the flower centres and glitter the petals. Cut a sentiment tag from the paper pad and 
adhere to the card with the leaves and flowers. Stamp, cut and colour the bone and stamp the 
sentiment in the centre. Adhere to the card and your project is complete.

Wednesday, November 09, 2016

Pampered Pooch Bag

Oh my goodness it's here!!!! The Pampered Pooch collection!!!
We have been so excited for this release!

I just had to use this image as it reminds me of my own pampered pooch!
I have been wanting to make a bag like this for ages and this was the perfect 
opportunity to make it! lol! I imagined a little pooch in it!!! 
Of course I had to make a card to go with it which I will share next week!


Here is the back..... I created a little pocket with the border die!

Make sure you stop by the blog and check out the projects
they are AWESOME!!!! 

Heartfelt Creations

To make this bag I used the following:

HCST1-401 Flower Shaping Kit
HCDP1-272 Pampered Pooch Paper Pad
HCPC-3760 Paw-fect Pooches Cling Stamp
HCD1-7116 Paw-fect Pooches Die
HCPC-3656 Delightful Daisies Cling Stamp
HCD1-760 Delightful Daisy Die
ANC850 Spring Bling Prills (Lemon Chiffon)
HCD1-783 Border Essentials Die
TSMP800 Mement Rich Cocoa ink pad
159723 Art Institute Dries Clear glue

Other Products Used : Tool Edger, Spellbinders Grand and Large Circles, Glitter glue,
White and brown pen, Scattered Straw and Peeled Paint Distress inks, 3D foam pads.

Cut two pieces of contrasting paper together at the same time using the largest of the
Spellbinders Grand Circle dies and adhere them together. Repeat this step so you have two
circles with your chosen papers on the outer. Cut the base off the circles so that they
are 5 1/2" tall at the tallest point. Draw a faux stitching line around the outer edges
in brown ink. Glitter the paws with glitter glue. Using two dies together one from the 
Grand Ovals and one from the large circle dies cut two pieces of brown paper from the pad 
together to form the handle and adhere them together, drawing faux stitching in white pen 
along the outer edge. Repeat this again for a second handle. Adhere to the outer of each 
of the sides of the bag.

To make the box in the centre cut a piece of paper from the pad that co-ordinates with the 
inside of the bag 11 3/4" x 8 3/4". Score 3" on all sides and then cut each corner piece
to form a tab. Fold and adhere together to form a box. Adhere the two sides of the bag to
the box.

For the front of the bag cut three pieces of different papers from the paper pad. 
2 pieces at 4 1/4" x 4 1/4" and one at 3 3/4" x 4 1/2". Distress all the edges with the 
edger tool and glitter. Cut the centre of one of the card panels and distress the edges
and glitter the edges and the image. Using 3D foam pads layer the make and three pieces
of paper and adhere to the bag. Stamp, colour, cut and shape the flowers and leaves.
Add prills the the flower centres and glitter the petals. Adhere to the card with a tag
sentiment cut from the paper pad. Stamp, cut and colour the bone and stamp the sentiment
in the middle. Adhere to the bag and glitter.

For the back of the bag create a pocket by cutting the picket fence border die in
the dark brown paper from the pad. Cut a piece of paper 2 1/2" x 8 " and adhere
the picket fence die cut to the paper. Put glue on the edges of the bag where the pocket
will be and place the paper over the side of the bag. Trim the excess away and draw the 
faux stiching. Cut a tag and sentiment from the paper pad and adhere with flowers to 
the bag handle. Adhere flowers and leaves to the pocket and the bag is complete.
Just add a gift and a note in the pocket!

Happy crafting everyone! 

Wednesday, November 02, 2016

Thinking About You


Yay it's that time of week again when I get to share my card
with you for Heartfelt Creations! I am just loving theses roses! 
I must make some in lilacs and purples tho!!!!! Lol!!!

This week I used the card fronts from the paper pad.
They do make very quick and easy cards!

We are so excited for next week! It's the Pampered Pooch release!!!
Eeekkkkkkkkkkkkk it's one you have been waiting for!
See a preview of the collection HERE


To make the card I Used the following:

HCST1-401 Flower Shaping Kit
HCD1-7110 Classic Rose Die
HCD1-7111 Classic Vines Die
HCPC-3752 Classic Rose Cling Stamp
HCPC-3753 Classic Rose Vines Cling Stamp
HCDP1-270 Classic Rose Paper Pad
HCPC-3474 Heartfelt Expressions Cling Stamp
TSMP900 Memento Tuxedo Black ink pad
TSMP800 Mement Rich Cocoa ink pad
159723 Art Institute Dries Clear glue

Other Products Used : White card, glitter glue, 3D foam pads, Peeled Paint 
and Victorian Velvet Distress Ink.

Watch this video HERE to see how to create the Classic Rose flower.

Using white card make a 6" x 6" tent fold card. Adhere a card front to the front of the card.
Cut the centre from another card front. Stamp the sentiment on it and using 3D foam pads 
adhere to the card. Glitter the edges and flowers. Cut a 6" x 6" paper panel from the pad and
adhere to the inner of the card, glitter the flowers. Stamp, cut, colour and shape the roses
and leaves and adhere to the card. Glitter the roses and your card is complete.