Wednesday, December 25, 2013

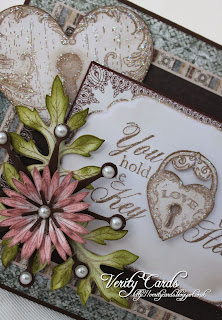
Everlasting Love


HAPPY CHRISTMAS !!!
Its Heartfelt Wednesday today !!
Here is my card for this week.

Check out the blog for some wonderful projects b the DT.
Heartfelt Creations


Here are what I used to make the card:
HCPC 3571 Keys and Roses PreCut set
HCPC 3569 Burnished Key PreCut set
HCD 741 Burnished Key Die
HCDP1 238 Floral Key Paper collection
HCPC 3545 Open Leaf PreCut set
HCD 736 Classic Leaf Die
HCD 722  Tattered Blossoms Die
HCPC 3468 Tattered Blossoms PreCut set
247027 Blending tool
459222 Paper Blossoms Tool Kit
159223 Paper Blossoms Moulding mat


Other Products Used: Glitter Glue, Hot glue, Beads, Distress Inks.
Brown and white card.

Cut a 6" x 6" panel from the paper pad. Cut a card to fit and adhere
panel. Cut a smaller sqaure card front and adhere with 3D pads. Cut
the Keys montage frm a cardfront and journalling sentiment. Curl and 
adhere using 3D foam pads. Use a strip across the card and adhere sentiment
cut from a panel on top with 3D pads. Glitter all edges and lacey bits.
Stamp the lock and clour using the blender tools, glitter. Stamp, colour, shape, 
glitter and adhere the leaves and flowers. Stamp Key set and die cut. Shade and
glitter the lock and adhere to card.Your project is now complete.

Hope you like it !
Happy Christmas !!!
Right I'm off to cook the turkey, drink wine, eat chocolates
and fall asleep infront of the telly ........
Mmm No chance there ! Games all afternoon !!
Have a fantastic day.

Saturday, December 21, 2013

Rock Concert !!


It was my Uncles Birthday last week and every year I make him a card.
He LOVES music, collects 78's and often goes to live gigs !
In fact he goes every year to see Fairport Convention
hence the wording on the image !!!


I used the House Mouse Triple CD for the image and paper.
Die cut tags and greeting.

He loved it ! Phew .............. !!!

Wednesday, December 18, 2013

Heartfelt Wednesday - Gift box


I made this gift box this week.
I used the Floral Keys Collection to make it.
Check out the Heartfelt Creations website
there is some wonderful projects there this week.
Also check out the sneak peek for the January release!

Heartfelt Creations

This gift box is ideal for a small gift or even chocolates !


I used the following to make my box:

HCPC 3573 Burnished Key Hole PreCut set
HCDP1 238 Floral Kep Paper collection
HCPC 3545 Open Leaf PreCut set
HCD 736 Classic Leaf Die
HCD 722 Tattered Blossoms Die
HCPC 3468 Tattered Blossoms PreCut set
354802 Classic Oval large
472168 Labels 20
459222 Paper Blossoms Tool Kit
159223 Paper Blossoms Moulding mat
368771 Scor Tool
368770 Scor Board


Other Products Used: Pearl gems, string pearl, lace, clear beads, hot glue,
3D foam pads, glitter glue, Distress inks.

Using the large die of Labels 20 cut two die cuts from double sided paper. 
Using matching paper cut a strip 5cm wide from a 12" x 12" page. Score 1cm
from the edge and fringe cut. Using the large oval die draw and cut around it.
Glue the fringe cut around the oval so that the papers match. Adhere this
to the labels 20 die cut to form the bottom of the box. Cut another strip
3cm wide and score 1cm along the edge, fringe cutting. Place theis inside
the bottom of the box and adhere ends to ensure a tight fit of the lid. Trim.
Cut another oval trim slightly and ahere to the strip to form the lip for the 
lid. Adhere to the labels 20 die cut. Adhere lace and string preal around
the base of the box.


Stamp, cut, colour and shape the leaves and flowers.
Adhere beads inside the flower.  Cut a smaller labels 20 die, stamp
sentiment and ink. Adhere to the lid. Adhere the flowers and leaves and pearls
to the box. Cut two tickets from the paper pad and adhere to the box. 
Glitter flowers, tags

I love making these boxes they are so effective and very easy.
Honest ! It looks harder than it is and after making one
the second, third etc are so easy !!!
Have a go !!!

Happy crafting.

Sunday, December 15, 2013

Owlie Gift bag


Its time for a new challenge over at
The Stamping Boutique

The Stamping Boutique

This time the challenge is paper piecing/piercing !!

I made this round gift bag for the challenge.
I used the digi image Owl twice
on this bag! A bigger and smaller one!
I paper pieced both of them with Nitwits papers.
And the paper I used for the gift bag matches !


I used my spellbinder dies to cut the circles
A strip of paper scored and cut makes the bit
to pop your gift in adhered to the two circles!
Flowers are from K&Co and leaves are a Martha Stewart punch.
I punched two sets of holes and tied ribbon
through them so that the gift bag is closed !

Well I better get on, so much to do and so little time !!!
Not only do I have all the Xmas goodies to bake, pressies to wrap
but my little girl is two on Xmas eve so all the party to plan for too !!!
Off to make some Red Onion Marmalade to go with my pate !
Happy crafting.


Saturday, December 14, 2013

Get your Skates on


Its time for another Christmas Card Club Challenge !
This time Sue set the challenge 
Get your Skates on !

So ........ scratch head ........ images ???
Lightbulb moment !!! I had one

I made a tag, I was running out f time and needed something quick !
Papers and Image from the CD.
I inked the edges with Distress inks and glittered them up.
Punched a hole and added ribbons !!

Well its nearly Christmas .............. better go wrap some 
pressies !!! I haven't even started to write cards !!
Have a great day.

Friday, December 13, 2013

For the Christmas table.


That's the challenge this week for the. DT at Polka Doodles !!!
Make something for the Christmas table !
It's open for Anything goes from anyone tho! 
Check out the other DT's projects and join the fun !!

Polkadoodles and Studio 12

Oh I got so excited at this challenge and its
the last one for our team this year so I got really excited !! 
So I made two projects !!!
I know ........... sad !!! lol !!!

For my first project .......
Every year I make peppermint creams 
to have with coffee after dinner ........
So I thought .......... how about something to serve them in.
Mmm ...... and I would really like to make a sleigh ........


This is what I came up with !
I used the embellishment of Santa flying in his sleigh
and blew it up in my graphics program until
it was a size I wanted, printed it four times.
Then flipped it horizontally and printed four more times.
I cut out and decoupaged and adhered all the pieces together
until I had two sides that were printed either side
and decoupaged on the outsides. 
I then printed a paper from the CD and cut a strip from it
curving one end. I adhered to either side of the sleigh
to make a place to hold my peppermint creams !
I added some tissue paper to make it look glam and of course
I glittered the sleigh stars and words and Santa with my Stickles !
When I showed it to Caitlyn she said it would make a nice gift box too ...... 


My second project was VERY quick and simple.
I made these Christmas trees from papers from the A Home for Christmas CD
I drew a triangle and then drew the same triangle either side of the first
so it was attached, cut out folded and adhered together !!
I used a heart from the embellishments on the CD, adhered it to a 
cocktail stick and placed it down the top of the tree !! 
I thought they would look great in the middle of the table amongst
the dishes stood in groups !

Hope you like my projects !
There is a challenge next week at Polka Doodles 
presented by the other half of the team.
Our Half of the team will be back in the new year !!
Remember there is also the Digi Choosday challenges too !!

Thursday, December 12, 2013

The Key to my Heart


As promised yesterday here is my second
project this week for Heartfelt Creations.
If you haven't already stop by the blog and check
out the amazing projects.

Heartfelt Creations


I used the following to make this :

HCDP1 238 Floral Key Collection
HCPC 3574 Journey of Love Keys PreCut set
HCD 726 Delicate Asters Die
HCPC 3494 Delicate Asters PreCut Stamps
HCD 740 Sweet Juliet Die
393386 Labels four
452255 Grand Calibur
247027 Blending tool

Other Products Used: Pearl Gems, green, brown, pink inks, glitter glue, brown card,
3D foam pads, white card, Kraft Knife.

Cut a 5 1/4" x  7 1/4" card using brown card and a card front from the paper pad. Cut the large
die in white card from labels four and stamp and glitter the sentiment on it. Using a Kraft knife
cut the middle panel from the card front and used 3D pads on the back to raise it
on the card front. Stamp, shade and glitter the heart. Adhere the outer of the card front
to the card, adhere the heart and then adhere the centre of the card front. Stamp, ink cut and 
adhere the flowers. Cut a Sweet Juliet flower and adhere the gems. Layer and adhere the flowers
and leaves to your card and your project is complete.


Happy crafting !!


Wednesday, December 11, 2013

A Place called Home


I made two projects this week at Heartfelt Creations.
I am going to share one today with you and one tomorrow.
For my first project I made an easel card.
Check out the inspiration over on the blog.

Heartfelt Creations


I thought this would make a nice New home card.
I know ........ I used Aster flowers again .....
I made a whole batch of them but they are now all used up !

To make the card I used :
HCDP1 238 Floral Key Collection
HCPC 3573 Burnished Keyhole PreCut stamp
HCD 726 Delicate Asters Die
HCPC 3494 Delicate Asters PreCut Stamps
HCD 740 Sweet Juliet Die
031473 Elegant Labels four
393386 Labels four
452255 Grand Calibur
247027 Blending tool

Other Products Used: Pearl Gems, green, brow, pink inks, glitter glue, white card,
3D foam pads

Cut a 6 3/4" x 5" card and another piece the same size to make an easel card.
Cut two of the large elegant dies using the floral keys papers. Cut the next die
on white card. Cut the second sized die of the labels four on white card and stamp
sentiment on. Using brown ink, stain the all white card lightly. Stamp, cut and adhere
the flowers and leaves. Cut two Juliet Flowers adhering gems. Stamp 4 keyholes, glitter
and decoupage. Adhere and glitter the layers to the card using 3D pads under the 
white card die cuts. Adhere and layer the leaves and flowers to the card and 
your project is complete.


Remember to pop by the blog !
Happy crafting.


Thursday, December 05, 2013

Happiness Always


As promised yesterday here is my second
project this week for Heartfelt Creations.
Heartfelt Creations

I used the following to make my card:
HCD 741 Burnished Key
HCDP1 238 Floral Key Collection
HCPC 3571 Keys and Roses PreCut set
HCPC 3569 Burnished Key PreCut set
HCD 726 Delicate Asters Die
HCPC 3494 Delicate Asters PreCut Stamps
HCD 740 Sweet Juliet Die
HCD 728 Timeless Amour Die
452255 Grand Calibur
247027 Blending tool

Other Products Used: Glitter glue, Hot glue, double sided tape,
3D foam pads, brown ink, Victorian velvet ink, pearl gems, promarkers,
white card, craft knife.


Cut a 6" x 6" card from white card, cut a 5 3/4" square paper and adhere to
the card. Cut 4 large heart die cuts and adhere to the paper. Use a card
front from the paper pack and stamp,glitter and colour the image. Using a craft
knife cut out the inner of the card front. Adhere using 3D foam pads so the inner
is raiser above the frame. Stamp, colour, glitter, cut and adhere your flowers and 
leaves. Adhere pearl gems to the Sweet Juliet flowers. Cut a sentiment from the paper
pad and stamp, cut and glitter keys. Adhere flowers, keys and sentiment to your 
card and your project is complete.

Wednesday, December 04, 2013

Special Wishes


This week I made two projects
with the new Floral Keys Collection
from Heartfelt Creations
Heartfelt Creations


Here is the first of them, a Concertina card.
This was quite hard to photograph so please 
excuse my photos !!

I used the following to make my card:
HCD 741 Burnished Key
HCDP1 238 Floral Key Collection
HCPC 3571 Keys and Roses PreCut set
HCPC 3569 Burnished Key PreCut set
HCD 726 Delicate Asters Die
HCPC 3494 Delicate Asters PreCut Stamps
HCPC 3570 Floral Doorway & Latch PreCut set
HCPC 3576 A Prayer For the Day PreCut set
HCPC 3574 Journey of Love Keys PreCut Set
HCPC 3572 Floral Keys and Locket PreCut Set
452255 Grand Calibur
247027 Blending tool

Other Products Used: Glitter glue, Hot glue, double sided tape,
3D foam pads, brown ink, Victorian velvet ink, pearl gems, promarkers,
white card, craft knife.

Using A3 white card cut 2 lengths 7" wide. Score every 5" and trim the excess.
Fold as a concertina and adhere the last section of the first piece and the first
section of the second piece together to form one long concertina card. Cut 5
card fronts and adhere to each section.


Stamp the door 5 times and decoupage
the lock and handle. Colour and glitter. Stamp colour and cut the flowers
and leaves adhering them all to the card front with a sentiment. For the inner
panels cut sentiments, journalling squares, pictures and panels glittering and adhering
to the card.Stamp colour and glitter the stamped images and adhere using 3D foam pads.
glitter the edges of the panels and lace work and your project is complete.

Check out the Heartfelt Blog there is some
amazing projects on there !
Heartfelt Creations

Heartfelt Creations Cash Giveaway for Everyone: We have a sleighful of savings for you! We're kicking off the week of savings with a $20 Heartfelt Creations cash gift for everyone that registers on December 7th from 12 (noon) -12 (midnight) EST and then you can choose which day's savings you want to take advantage of from December 8th-December 13th. See all the details:http://www.heartfeltcreations.us/sleighful. Mark your calender and tell all your friends!

My second project I will share with you tomorrow.
Happy crafting !!

Sunday, December 01, 2013

Carolling Snowmen


Its time for a new challenge over at
The Stamping Boutique

The Stamping Boutique

This time its a recipe challenge !!
Use ......
3 Embelishments
1 Digi Image
Glitter/ Glitter glue

I used the digi stamp Carolling Snowmen 
and coloured it using promarkers.
For the card I made an over lapping pocket
and used Elegant Labels 8 for a tag, adding lots of ribbon to it.
I glittered the flowers and snowmen, 
the snowflake is already glittered !!
I used a Marianne punch for the borders.
Papers are Nitwits.
Hope you like it  !!

Well I guess I better get on, 
so much to do and so little time !!!
Happy crafting !
Remember to pop on over and join the challenge !

Presents under the tree


The challenge set by Dawn
over at the Christmas Card Club
this week is .......
O Christmas Tree !!


I used a Wild Rose Image and glittered it up.
Papers are Nitwits, flourish is Cheery Lynn and sentiment LOTV.
Yes ........ those Snowflakes again !!! lol !
Told you I loved them !!!
I have made a card similar to this before but I 
just LOVE this image so much !!

Pop on over and check out the other ladies 
creations. Their blogs are on my sidebar.
Happy Crafting !!
Oohhh It will soon be Christmas !!!