Saturday, November 30, 2013

Memories - FLORAL KEYS


As promised here is my second project for 
Heartfelt Creations this week.
Have you checked out the new release
FLORAL KEYS ???
pop on over and also check out the wonderful
inspiration the Design team have for you !!

Heartfelt Creations

I made this one in the dark too !!! Lol !!
I am just LOVING the new collection !!


Here is how I made it and what I used !!

HCD 741 Burnished Key
HCDP1 238 Floral Key Collection
HCPC 3573 Burnished Key Hole PreCut set
HCPC 3575 Script Key Background PreCut set
452255 Grand Calibur
452068 Grand labels one
247027 Blending tool

Other Products Used: Lace, Doilies, Glitter glue, Hot glue, Brown card, double sided tape,
3D foam pads, brown ink, 

Cut a 6" square card in brown card. Cut two different sizes from the Grand Labels, a 6"x2 1/4"
rectangle from three different pieces of paper. Glitter all the edges. Cut a card front image 
and adhere to brown card. Cut another image out, glitter and adhere with 3D foam pads.
Stamp both stamps and colour using the blending tools and glitter. Stamp another of the burnished key 
set and die cut. Colour and glitter the key. Layer all the papers and doilies and adhere.
Add lace and your focal image along with a ticket message and your project is complete.

Happy crafting !!!

Friday, November 29, 2013

Reindeer Food


Its time for another Challenge
at Polka Doodles !!!

Polkadoodles and Studio 12

This week the challenge is to follow a Sketch !
Now I am no good at Sketches and I have to admit this
one really had me stumped.
But then like it does .......... it came to me in the middle
of the night when my little girl was sick
and I was awake looking after her ............... lol!


A header for sweeties I thought ..........
Then I thought how about a header for Reindeer food
and as I am going to a craft fair next weekend I
could make loads and sell them !!!


So that 's what I did !!
I used the A Home for Christmas CD for this, paper
and all the embellishments are from the CD.
I just put them together with text in my graphics program !
The star has Santa flying through it, the three
circles are the Reindeer, the ribbon
is the vertical line and the Title is the horizontal line !!
I did 3D up the embellishments too !!


I wrote a little poem on the back

Sprinkle on your lawn at night,
The moon will make it sparkle bright.
As Santas reindeer fly and roam,
this will guide them to your home !

Hope you like it !!!
Why not pop over and join in the challenge !


Especially for you, Floral Keys NEW release !


WOW !!! Over at Heartfelt Creations
we have a NEW RELEASE !!!
Floral Keys.
Pop on over and check out the wonderful stamps, papers and die !
And of course the wonderful Inspiration from
the other ladies on the Design Team !

Heartfelt Creations Design Team


I made a pocket card with tags.
Would you believe I made this in the dark !!
 I didn't know until I got up the next morning if it had worked !!


I used the following to make my project.
HCD 741 Burnished Key
HCDP1 238 Floral Key Collection
HCPC 3573 Burnished Key Hole PreCut set
HCD 741 Burnished Keyset
452255 Grand Calibur
472107 Lacey Oval Nestables
247027 Blending tool

Other Products Used: Lace, Glitter glue, Hot glue, Brown card, double sided tape,
3D foam pads, brown ink, 


Cut two 6" square cards in brown card. Cut diagonally along the front of one card 
and the back of the other so that there are triangles. Adhere the two square together
so that the triangle fronts fold over each other. Cut a square of paper 5 3/4", adhere
lace to the top and then adhere it all to the inside back square of the card. Cut two
triangles with side 5 1/8", adhere lace to the edge and adhere to the triangle flaps.
Adhere one flap over the other and along the bottom so you have a pocket. Cut the largest
die from the Lacey circles in brown card and a front from one of the card fronts in the 
paper pack. Cut and glitter the flowers out from the other same image and adhere with 
3d Foam pads.Stamp the Burnished key and cut out using the die. Shade using the blending 
tool and glitter. Cut tickets and journalling squares from the paper, glitter and add keys.
adhere lace to them to create tags and your project is complete.
HCDP1 238 Floral Key Collection
HCPC 3573 Burnished Key Hole PreCut set
HCPC 3569 Burnished Key PreCut 

I have another project this week I made which I will post tomorrow
There is so much on this post already !!!
Happy crafting and go check out the new release !!

Tuesday, November 26, 2013

It's a Boy


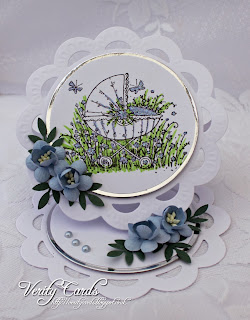
I made this New baby card using a Wild Rose Studio stamp.
I coloured with promarkers and glittered with stickles !

The card is made using a Marianne die,
added flowers, leaves and gems.
I do love this image and its SO
VERY VERY easy to colour !!!


We have had two new baby boys in the family this year
and I had no cards ready !!! 
Now I bet the next babies will girls so I had better make some of those too !!
Well I better get on, more peppermint creams to make today !
YUM !!!!

Happy crafting !

Sunday, November 24, 2013

Seasons Greetings


I made this Christmas card, not sure I have used
this image before, but I have definitely
used a similar design before !!
I changed up the layout a bit but those
snowflakes are still there !!! lol!!
I even got to buy some more a few weeks ago !!


I have also been playing with pictures !! 
Just testing this out !!

Image and sentiment is LOTV,
papers are Nitwits, border and holly are 
Martha Stewart Punches, 
I also added a Marianne swirl die cut
under the roses.

Christmas is coming !!!
Not long now !!!
Happy crafting.

Wednesday, November 20, 2013

Heartfelt Wednesday - A card and a tag


I have two creations this week to share
that I made for Heartfelt Creations.
I made a card and a tag.

First of all the card !


I thought I would make a shaped card and I so wanted
to have a go at the Aster flowers so
this is what I came up with !!!

I used the following :
HCD 726 Delicate Asters Die
HCPC 3494 Delicate Asters PreCut Stamps
HCD 740 Sweet Juliet Die
HCDP1 231 Posy Patch Papers
HCPC 3568 Moments With You PreCut Set
HCD 728 Timeless Amour Die
354806 Standard Circle Die
452062 Grand Circles
452255 Grand Calibur
459222 Paper Blossoms Tool Kit
159223 Paper Blossoms Moulding mat
247027 Blending tool

Other Products Used : Distress Inks, Pearl Gems, 3D Foam pads, Double sided tape, 
Spellbinders Grand Decorative circles, White card stock, glitter glue

Using the white card stock cut the largest decorative circle die and then again
using folded card to create a card base. Adhere the circle to the card base.
Cut a circle and layer with 3D foam pads from the paper pack. Cut and adhere
four die cuts from the Timeless Amour die set. Stamp the sentiment and cut using
the standard circle dies, ink and glitter. Colour using the blending tool.
Stamp, cut and shape the flowers and leaves, adhere pearls to the flowers from
the Sweet Juliet die. Layer and adhere all pieces to the card and glitter the 
edge of the larger circle, your project is now complete.

Now for the tag !!
I made an extra flower so I just had to use it !! 


This was really quick and easy to make.
I used the following for this:
HCD 726 Delicate Asters Die
HCPC 3494 Delicate Asters PreCut Stamps
HCD 740 Sweet Juliet Die
HCDP1 231 Posy Patch Papers
031473 Elegant Labels Four
393386 Labels four
3354 Classic Message PreCut Set
452255 Grand Calibur
459222 Paper Blossoms Tool Kit
159223 Paper Blossoms Moulding mat


Other Products Used : Distress Inks, Pearl Gems, 3D Foam pads, Double sided tape, 
Ribbons, String Pearls, White card stock

Using the white card stock cut the inner die from Elegant Labels Four for your label.
Cut the largest die of Labels four from Posy Patch papers and adhere using 3D foam pads
to the label. Cut out the smaller of the Sweet Juliet flowers and glue pearls to them.
 Stamp the sentiment onto white card and cut out using the next size die 
from labels four adhering on top of the label. Stamp, die cut and ink your Aster flowers
and leaves, shaping them using the Blossoms tool kit. Layer the flowers and leaves and 
adhere to the tag. Cut two different width ribbons and pearls and tie to the edge of
the label. Your Project is now complete.


I loved making these projects.
Check out the Heartfelt Creations blog and the other DT's
projects, there is some amazing inspiration there.
Plus there are some sneaky peaks of the new release !!

Heartfelt Creations


Sunday, November 17, 2013

Christmas Wreath


Over at The Stamping Boutique we are having a Party !!
One of the challenges is ....
So..... I got to work and my daughter helped !!
I wanted to make something other than a card so I came up with this wreath.
Here is my girl colouring in the digi images 
Holly Berry with Ribbon (I just used the holly)


We cut everything out and glittered the berries up on the holly, added buttons
(pink to fit the challenge) to the Gingerbread men


We then traced around two pan lids for the wreath !
I know I know ........ I have dies galore and a Cameo !!


I attatched a loop of ribbon to the wreath shape and then 
we used 3d foam pads to attatch the gingerbread men.
Hot glued the holly into place, added a bow
and voila !!


So its now hanging proudly in Caitlyn's room
she cant wait for Xmas to hang it
she is so proud of herself !!

So pop on over to the blog and check out the party !!
My other project fr this challenge will be posted in about 15 mins !!


Xmas Banner


I loved the Wreath I made with Caitlyn so much
I thought I'd get the pens back out and make a banner to match !
It was REALLY hard to photograph so please forgive the photos.


Its Party time over at The Stamping Boutique 
pop on over and check it out !!

The Stamping Boutique

This project is for the challenge
Christmas, use 2 or more buttons, Pink, green and white.


I used the Gingerbread man with buttons digi stamp
and Holly Berry digi stamp.
I used my new Spellbinders Alphabet set for the words Merry Xmas.

Hope you like it!!!
Remember pop on over to the party, there are some fantastic prizes !!

Saturday, November 16, 2013

Pretty in Pink


This week the challenge set by Carol is
PRETTY IN PINK
at the Christmas Card Club.
This is a group of ladies who
just want to get ready for Christmas and make our cards !
It means come December we have all our cards ready........
Well that's the theory !! lol!

So, I thought I would use my new Sillhouette for this
and made a Christmas box.


Papers are Nitwits, pink with snowflakes
The snowflake tree dec makes another appearance !!
The glitter holly I got from The Range a couple of years ago,
I just cut it all down.
I tinged the poinsettia pink and then added glitter glue
over the poinsettia and around the edges of the base and top of the box.
Added ribbon and voila !
I always make Peppermint Creams for Christmas
so I thought this would make a nice box for them as
a present for someone who likes pink !
Great challenge Carol thank you !
Pop over and check the other girls makes out
you can find their links on my sidebar.
Happy Crafting !

Friday, November 15, 2013

Xmas House


SHAPED Card, that the challenge
this week at Polka  Doodles !
Pop on over and join in the fun !


I made my card by making a scene using
embellishments from A Home for Christmas CD.
I cut the scene out and attached it to a tent card.
I then printed and decoupaged the Santa Sleigh and reindeer,
tree, snowman and all the windows and door.
I glittered around all the windows and door and snow 
with my Stickles.


A quick but effective card !
Hope you like it !

Thanksgiving


This week the challenge over at The Stamping Boutique
is THANKS GIVING
Click on the pic and join in the fun !!

The Stamping Boutique

Now I know your going to say we don't celebrate Thanksgiving 
here in the UK ........
Well we do in our house !!
After all I lived over there and really enjoyed the Holiday !
I figure we can all give thanks for something !
So I made a Place name and napkin ring.


For the napkin ring I used a border punch either side 
of a narrow strip of card,
layered printed papers (Nitwts) on,
attached ribbon and gems and stuck it together !
For both items I used OWL digi stamp
and paper pieced it to match the card I made previously.


I used a bulldog clip for the place name,
covered it in paper, added ribbon and gems and the owl !
I printed a name and cut using a Spellbinders die.
I then rubbed ink over the die to add colour.

Look out for my second post later this morning !!

Wednesday, November 13, 2013

Heartfelt Wednesday - Altered Frame


Here is the project I made this week
for Heartfelt Creations.
An Altered Photograph Frame.

Heartfelt Creations

The photograph is my beautiful Grandma,
I wish I had made one of these for her she would have loved it !


Heartfelt Creations Products and Products Carried by Heartfelt Creations:

HCDP1 227 Vintage Floret Paper Collection
HCPC 3500 Open Vintage Florets
HCPC 3502 Mini Vintage Florets
HCD 727 Vintage Floret Die
HCD 736 Classic Leaf Die
HCD 740 Sweet Juliet Die
HCPC 3545 Open Leaf PreCut Set
HCD 733 Decorative Lattice Swirl Die
119391036 Rose Metallic 3D Stamp paint
119390636 Moss Green Metallic 3D stamp paint
119390536 Walnut Brown Metallic 3D stamp paint
119390436 Copper Metallic 3D stamp paint
459222 Paper Blossoms Tool Kit
159223 Paper Blossoms Moulding mat

Other Products Used : Wooden Frame, Pearl Gems, String pearls, Brown card, white card, 
Modge Podge, foam brush, hot glue and gun, distress inks, die cutting machine and glitter glue.


Lay your chosen frame on top of a piece of Vintage Floret paper
 and cut to fit frame.  Adhere the paper to the frame using Modge Podge 
and foam brush and then brush Modge Podge
over the paper.Let this dry.


 Stamp and cut your leaves and flowers, 
Colour them using the inks and 3D paint. 
Add glitter glue for sparkle to the flowers. 
Cut 4 flowers from the Sweet Juliet die
in brown card and then coat in Copper 3D paint for effect. 
Cut three Lattice swirls in white and
colour using all the 3D paints for a vintage effect. 
Adhere pearl gems to the flowers and string 
pearls around the frame. 
Arrange the swirls, leaves and flowers and adhere them to the frame.
Add a photograph and your project is complete.


Please go and check out the blog there is
some amazing inspiration there.

Happy Crafting !