Monday, April 08, 2024

Sunflowers with a difference!


Haha you know me! Let's make the most of our crafty stash.... these gorgeous flowers are actually a sunflower! But coloured up in different colours and shaped with a twist on the petals you get something totally different! And don't you just love the colour contrast of the flower on the Bon Bon Box?


The flowers went from white card diecuts to these vibrant flowers. 
Want to know how to make them too?

Directions:

1. Using Florals 26 die cut using white card the leaves and the two largest flowers. Cut three layers for each flower.

2. Using Leaf Green ink, colour and shade the leaves. Shape the leaves so that they curve upwards with a gentle fold in the centre. 

3. Colour the centres of the flowers in Buttercup Yellow and then shade the outer with Light House. Add more shading to the outer of each petal for more shaded look.

4. Spray each flower with water as you shape them. With a shaping tool use a circular motion in the centre so the petal come upwards. With your fingers twist and shape each petal. Do this for each layer. Adhere three layers together and add stamens.

5. Die cut the Bon Bon box die twice using the Garden Party paper. Adhere the die cuts together and shape the box so it is closed.

 6. Tie white ribbon around the closing and create a bow. Die cut the white tag and add ribbon. Adhere the tag along the side of the closing so it dangles down.

7. Adhere the leaves and flowers along the side of the closing and your project is finished!

Have lots of crafty fun my friend!

Remember you can SAVE 10% on ALL your purchases with my affiliate code on the Elizabeth Craft Designs website here https://ecraftdesigns.com Just add the code LIZ_GAZE at checkout! Use this code each time you purchase and SAVE 10% on your entire cart!  


Products Used: 

Bon Bon Box https://ecraftdesigns.com/products/bon-bon-box-large

Flowers 26 https://ecraftdesigns.com/products/florals-26

Garden Party Paper https://ecraftdesigns.com/products/garden-party-2

Stamens, White card, white ribbon, Ranger Inks - Leaf Green, Buttercup and Light House


Wednesday, March 27, 2024

Easter Carrot Boxes


I’ve been growing carrots in my craft room today! 🤣 🥕😍 Not any old carrots tho… these are carrot boxes designed by the lovely Joset Van De Burgt and of the course the flowers are from Angelica’s Wild Flower 2 set of dies from Elizabeth Craft Designs! 😍


Easter is almost here and this is for my Uncle, it’s filled full of his favourite Lindt eggs!
I have to be honest…. These came together so super quick and so easily too! I’ll be making more of these next year for sure!

For those of you who asked here is a video tutorial on how I made the flowers and box!

SAVE 10% on ALL your purchases with my affiliate code on the Elizabeth Craft Designs website here https://ecraftdesigns.com Just add the code LIZ_GAZE at checkout! Use this code each time you purchase and SAVE 10% on your entire cart!


Products used:
Foam paper for the flowers

Wednesday, February 14, 2024

Stitched with love.


Do you ever sit at your craft desk and have no idea what you are going to create? 
Yeah that was me today! BUT... as soon as I took out the Pretty Pastels paper pad and the Wild Flower3 die set from Elizabeth Craft Designs I just knew I was going to create something very different for me!

If you are looking for a quick card for weddings, anniversaries and valentine's day 
then this is a perfect card to create! 


 Directions:

1. Using the outer Hearts Cutouts die create an easel card base. Fold over the top piece in half and cut another of the heart die in white card and adhere to the card base.

2. Using the Pretty Pastels paper die cut two of the hearts in pale pink, distress the edges and using a black pen draw faux stitching around the hearts. Adhere to the card base.

3. Die cut flowers and leaves from the Pretty Pastels papers using the Wild Flower 3 dies and using a black pen add faux stitching.

4. Stamp the sentiment from Garden Party Elements onto the heart.

5. Adhere the flowers and leaves and gems and your card is complete.

SAVE 10% on ALL your purchases with my affiliate code on the Elizabeth Craft Designs website here https://ecraftdesigns.com Just add the code LIZ_GAZE at checkout! Use this code each time you purchase and SAVE 10% on your entire cart!


Have lots of crafty fun my friend. And Happy Valentines Day!


Tuesday, February 06, 2024

Create a Gift Bag with Decorative Dies!


Do you love to create coordinating projects for a loved one? Me too! Here is a gift bag that goes with the card I made last week for Elizabeth Craft Designs. Perfect for Valentines, Mother's Day a wedding favour or any occasion! 😜
Last week I was asked how I created theses flowers so here is a video I uploaded to my YouTube channel with step by steps on how to create these gorgeous flowers PLUS this gift bag!

SAVE 10% on ALL your purchases with my affiliate code on the Elizabeth Craft Designs website here https://ecraftdesigns.com Just add the code LIZ_GAZE at checkout! Use this code each time you purchase and SAVE 10% on your entire cart!

Oh and here is the card this bag coordinates with! You can find the instructions HERE . Now I just need to decide if I use this for Mother's Day or Valentines.....


Happy crafting my friend!


Thursday, February 01, 2024

Create a Tool Box Gift Box!


Do you love to create something different and make the most of your dies? Yeah me too!
This box was made with tag dies! 😍


Want to make one too? Click here and watch the replay of the live over on Heartfelt Creations Facebook page. https://www.facebook.com/HeartfeltCreations/videos/626627842922211/

It's perfect for friends and family that love DIY!


Have lots of crafty fun my friend!


Wednesday, January 31, 2024

Use your decorative die for a quick card!


Sometimes time can run short and we need to create a quick card that still has that 'wow' factor to it!
Using the Ornate Pocket Accents Die from Heartfelt Creations this card came together super quickly. 

Click on the link here and watch  the video tutorial there are some variations on this card that you can create as well! Have lots of crafty fun my friend! 


Tuesday, January 30, 2024

Garden Party Valentines


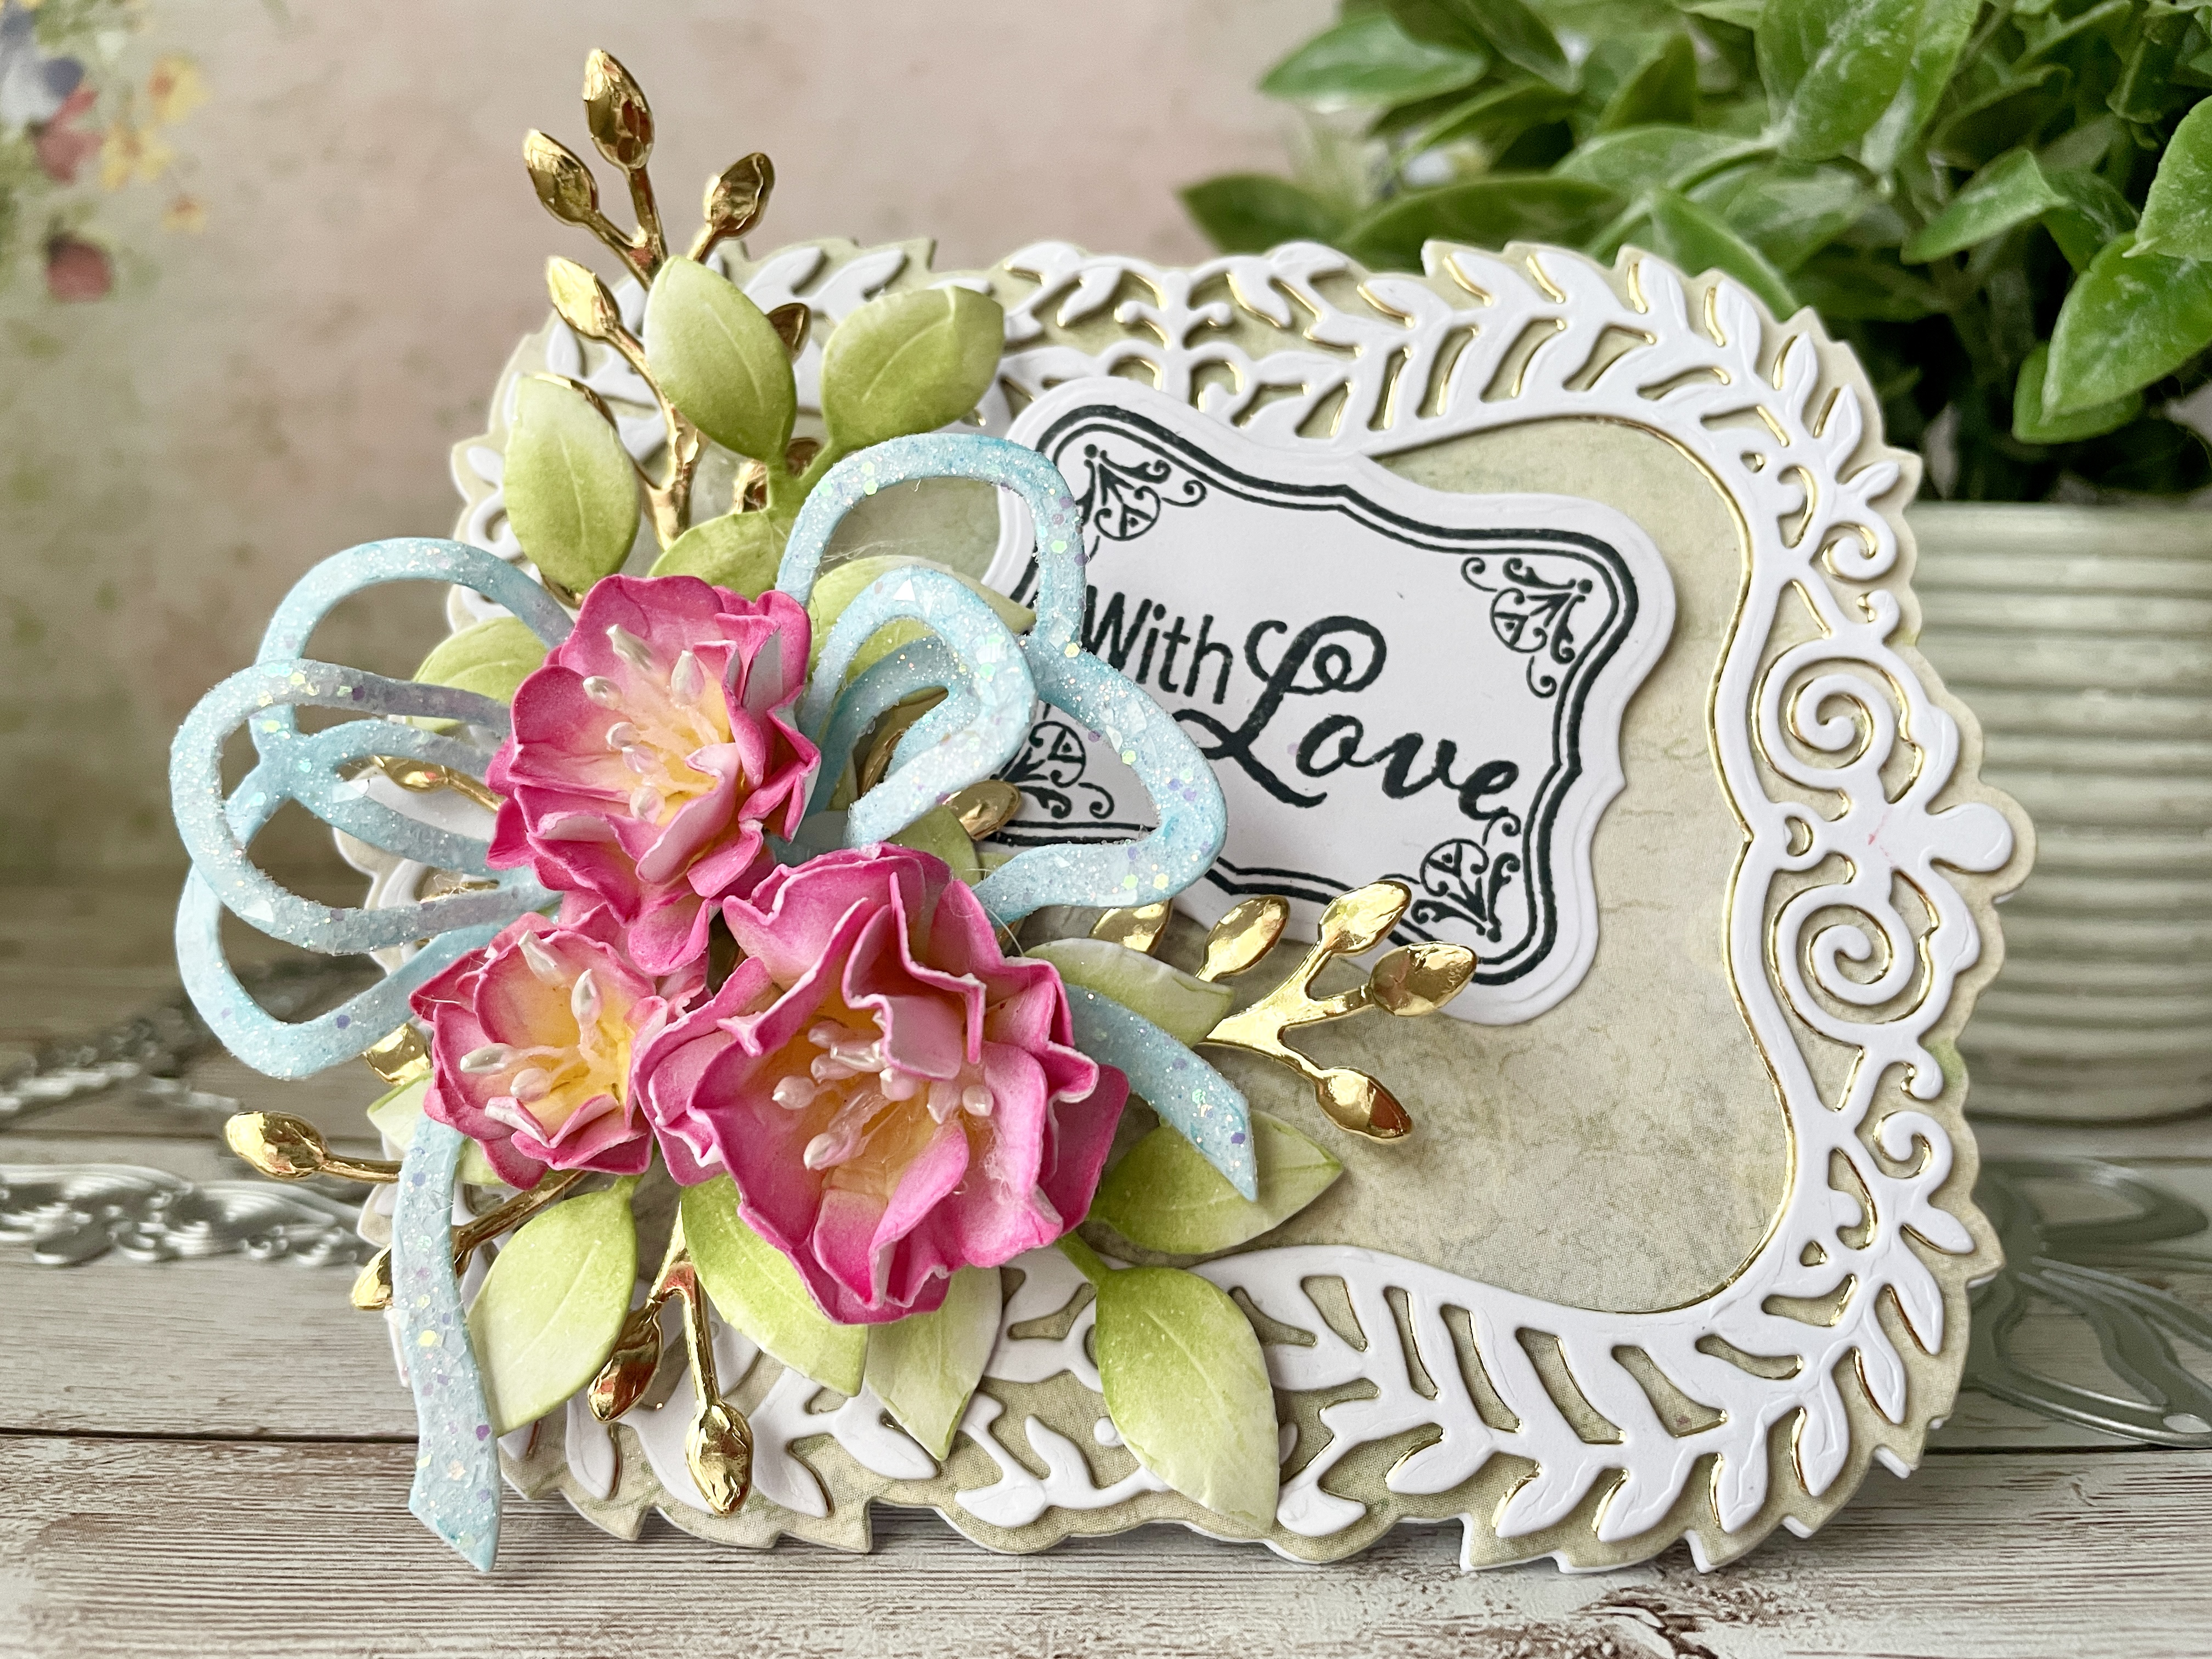
I'm excited to share my first project as part of the Elizabeth Craft Designs DT! A shaped card with the Garden Party Collection that's perfect for Valentines Day or Mother's Day.... yikes they are both coming up fast! I think this will be my Hubby's Valentines card, he just loves getting cards with flowers on! 

How would YOU like to save 10% on your entire order over at Elizabeth Craft Designs? After all who doesn't love a savings! All you need to do is click here on my affiliate link and shop as normal. The discount will be automatically applied at checkout PLUS you can use this link every time you shop and SAVE! It's not a one time thing just make sure to save this link so you can use it time and time again! ecraftdesigns.com/LIZ_GAZE

Ok... here is the fun bit, instructions so you can create this gorgeous card too!

Directions:

  1. Cut a card base using the outer die from the Frames and Elements Die set. Use a fold piece of white card and place the die over so the fold is still intact, creating the card base.
  2. Using the same die cut two pieces one in white card and one a patterned piece from the Garden Party Paper Pad. Adhere the white die cut to the card base and then the patterned paper to that.
  3. Using the decorative die from the Frames and Elements Die cut two die cute. One in white card and one in gold. Adhere the white over the gold and offset slightly creating a drop shadow with the gold and adhere to the card base.
  4. Stamp the smaller frame image and a sentiment from the Garden Party Elements onto white card in black ink and die cut with the corresponding die from the Frames and Elements Die set. Add a 3D foam pad to the back in the top left corner and place to one side for now.
  5. Die cut using white card three of the flower dies. I used the individual dies (not the one with three flowers on) and used the smallest three sizes. Cut three pieces of card for each size.
  6. Colour the flowers using inks. I used Ranger Archival Buttercup and Vibrant Fuscia inks.
  7. Work on each flower individually. Spritz with water on the back and then shape with a flower shaping tool on the front. Using your fingers pinch in the tops of the petals. Adhere three of the same size flowers together, layering so that the petals interleave. Add stamens to the centres.
  8. Die cut three of the leaves in gold card and three of the curved leaves in white card. These are from the die set Greenery Fillers 1. Colour the white die cut leaves with green ink, I used Leaf Green.
  9. Die cut the bow from the Frames and Elements Die set and shade with ink. I used Forget Me Not and applied it very gently. When coloured glitter this die cut. 
  10. Adhere the leaves onto the card. You will need to cut them down as needed.
  11. Adhere the flowers onto the card and then cut the bow in half and adhere each half either side of the flowers.
  12. Lastly take the sentiment and adhere to the card on an angle tucked in the flowers.
Have lots of crafty fun my friend! Can't wait to see what you create, if you are not already in the Elizabeth Craft Designs Family Facebook Group make sure to join HERE and share your projects too! 


Remember to save 10% on your entire order over at Elizabeth Craft Designs click here and shop as normal and the discount will be applied at checkout ecraftdesigns.com/LIZ_GAZE PLUS you can use this link every time you shop and SAVE! It's not a one time thing just make sure to save this link so you can use it time and time again!

Tuesday, January 23, 2024

Faux Embossing and a shaped card!


Cupcakes are perfect for any age and celebration!
Another quick card this time using the faux embossing technique on the pink paper.
Faux embossing is great way to maximise your dies!

You know I was live with this card.... click here for the replay and to catch all the crafty tips! https://www.facebook.com/HeartfeltCreations/videos/777264594434198/


Monday, December 11, 2023

The fun way to create a Christmas Book box!


Flowers and boxes! I have been in seventh heaven creating this project with the Flowers 24 and the Book Box die sets from Elizabeth Crafts! And I can't wait to create more, they are the cutest boxes!

If you are a crafter that is looking for some last minute inspiration for your Christmas projects then this is not only fun to create but will definitely wow those who receive it! 
All you need to do is decide what to put in it.... Mmm Chocolates! 


Directions to creating the box:
1. Die cut the outer book die from the Book Box die set in paper/card of your choice. Fold using a bone tool along all the score lines.

2. Die cut the inner box die from the Book Box die set in paper/card of your choice. Fold using a bone tool along all the score lines.  Adhere the box together and adhere to the inside of the book die cut on the right hand side.

3. Using the 2 rectangle dies together from the Book Box dies cut a frame 6 times. Put 2 aside for later. Cut the long side of the frame away from the shorter edge, so you have two long strips from each frame. Adhere these around the inner and outer top edge of the box. Fill the box with tissue paper and cut snowflake confetti using the snowflake die from the Christmas Sweater die set.

4. Die cut the decorative die and glitter the die cut. Do this twice. Using 1 of the frames you put aside adhere this to one of the decorative pieces and trim. Adhere this to the front of the book box with foam pads. Using the second die cut, cut it in half and adhere the remaining die cut frame so it goes all the way around the half piece of the decorative piece. Adhere this to make a pocket on the inside of the book box.


5. Die cut three tags, two of one and one of the other design and place inside the pocket. Adhere a snowflake to one for decor and to coordinate with the confetti in the box. 

6. In gold die cut the words Let it Snow from the Winter Wishes Die set. Adhere the words along the spine of the book box.

7. Die cut in white card petals for one large and two medium sized flowers from the Flowers 24 set. Use two layers for each flower. Colour with Bamboo Leaves and Ladybug Red ink. Shape and adhere together. Use stamens for the flower centres.

8. In Gold card cut the open holly leaf die three times. In white card cut the closed holly leaf die also three times. Colour and shade the white die cut with Bamboo Leaves ink and shape using a flower shaping tool. Adhere the gold die cut ontop of the coloured one.

9. Arrange two sprigs of holly onto the front of the book box and adhere two flowers ontop.

10. Take the remaining sprig of holly and trim down so it will fit on the inner pocket. Adhere in place and adhere a flower on top and your project is complete!


Tuesday, December 05, 2023

Top Tips to Create Garden Lily Flowers!


Are you a crafter that loves to create flowers? Take your flower shaping to the next level and follow the tutorial in my video here https://youtu.be/Yxp3cTgPAaQ where I share top tips so that you can create beautiful flowers for all your crafting projects.

I used these stunning Garden Lilies to decorate the top of a box I created with slimline dies! What will you use yours for? 


Friday, December 01, 2023

Mini gift bags with one die!


Do you love to make the most of your crafty stash? Me too! The Decorative Circle Frames Die is so versatile, perfect for cards, decorative die cuts and of course this fun gift bag! 

And event better this gift bag maximises your papers too as you cut the diecuts in half for each side of the bag! J

Want to learn how to make one too? Click play here and follow the step by step tutorial I did live on the Heartfelt Creations Facebook page! https://fb.watch/oLgnJZEyPw/

Another favorite thing to create for me are shaped cards, remember this one we made? It will go perfect with this gift bag for my friend  this Christmas! 
 

Wednesday, November 22, 2023

Make the most of your circle & oval dies!


Decorative circle dies are fun to use for the opening on bags, gift card envelopes, easel cards and so much more! And those basic shapes... the ovals, they make fantastic apertures not only in cards but gift bags/boxes too! 

Want to know how this was made? Follow the step by step tutorial here on the Heartfelt Creations Facebook page. https://fb.watch/oLiiVlIJ4V/

Here are a few other projects made with the Decorative Circle dies for inspiration! Have lots of crafty fun my friend.


Tuesday, November 07, 2023

Sending you a hug!


There are times we all just need a hug! And there are times we can’t be with the person who needs a hug… so what better way to let that person know they are loved than to send a card! 

It’s always fun to create scenic cards with cute images. Click play here now and follow the steps in the live I did over on the Heartfelt Creations Facebook page. https://fb.watch/oLdBrXi9sQ/

You can create this card too, here are the products used. 

Mushroom Cottage Collection and the Fancy Classic Rectangle Frame Die.

Tuesday, October 10, 2023

Take your gift giving up a notch with this elegant bag!


I couldn't resist creating a gift bag with two decorative dies I hadn't yet used.... Shh I know we all have them in our stash, things we haven't used! 

The Noel Decorative Die makes a fantastic shaped side of this bag. And the handle... well that's one of the dies in the Classic Companion Border Die set! A die created to make a card with! 

If you are a crafter that loves to create bags and boxes too then click play here and learn the steps to create yours! https://fb.watch/nB7AQ9T-0Q/

Happy crafting my friend!

Sunday, October 01, 2023

Creating a scenic card the EZ way!


Are you a crafter that’s looking for some inspiration to jump start your creativity for your Christmas projects? I don’t know about you but this year I’m trying to get a head start on making Christmas cards so when December rolls around I’m not rushing to get them done! 

Colouring these images and creating a scene was fun to do and you can see how you can do this too, just click play now and watch the replay here: https://fb.watch/noTXcRGI6a/

Have lots of crafty fun my friend. 🤗

Monday, July 31, 2023

Creating Art Foam Sweet Pea florals the EZ way!


I don't know about you but creating flowers is always fun to do! While I have had great fun creating paper Sweet Pea florals I wanted to see how they looked using foam! 

What do you think? I just LOVE the look! It really makes the flowers versatile and with those filler images behind a floral arrangement can really pop on your card.

This card was created live over on the Heartfelt Creations Facebook page, if you'd love to learn how to make the flowers and or card then make sure to click here for the tutorial. https://fb.watch/m7y38OSHAU/

Happy crafting my friend!

Friday, July 14, 2023

A Quick & EZ Fun Christmas Card!


If you are a crafter like me that just loves to create fun Christmas cards then this card is for you!
I created this using the Holiday Ornament collection from Heartfelt Creations.

Do you ever look at images and see something else you can use it for? Do you see the perfume bottle in the ornament? Oh my goodness that would make a fantastic card!

If you would like to make one of these too I created this live over on the Heartfelt Creations Page here, Have to admit these were so much fun to create! https://fb.watch/lN5WHeuYYH/

There are lots of video tutorials on my YouTube account as well make sure to subscribe! https://www.youtube.com/@lizgaze


Wednesday, July 12, 2023

The EZ steps to creating a shaped easel card with a shaker element!


The day has come.... The final collection has been released from Heartfelt Creations. The Holiday Ornament collection! I just couldn't resist making this card with the stunning Ornament, and the great things about this image is it lends itself to having not just one large shaker area but these smaller ones that really adds something different to the card.

If you are a crafter like me that loves to create this kind of card then make sure to click here and watch my YouTube video so you can make one too. https://youtu.be/sM0B472gh3E


Friday, July 07, 2023

A quick & EZ framed card using decorative dies!

Are you a crafter that loves to create easy cards perfect for any occasion? This framed card is so versatile and can be decorated in many ways, the choice is yours!

I don't know about you but creating cards that can be used for multiple occasions always means I have a card on hand when I need to grab a card to post out!

Click here now to see how you can create this card too. https://youtu.be/zwqVwdZSQEc Join me and learn the steps to creating Cherry Blossom flowers, colouring cute birdies and creating a versatile shaped card base.


Wednesday, July 05, 2023

Christmas made easy!


Have you started creating your Christmas cards yet? I've got 6 done now yay!!!! So far I am ahead of last year... I had none made yet this time last year! My goal is to keep creating throughout the rest of the year so I have my cards ready in time and not have a mad rush in December to get them all done!
I created this fun card live over on the Heartfelt Creations page, if you missed it then make sure to click play here so you can make this card too https://fb.watch/lBfqdQcyjl/